Appearance
Advanced
1 Monitor Service Instruction
1.1 Create Prometheus
bash
1. Create monitor root directory: /iothub/monitor

2. Create 3 folder in '/iothub/monitor': mkdir alertmanager  grafana  prometheus

3. Modify grafana folder permisson: chown -R 472:472 /iothub/monitor/grafana/

4. Copy alertmanager.yml to folder '/iothub/monitor/alertmanager'

5. Copy 'config.monitoring' file into folder '/iothub/monitor/grafana'. In this folder, change the password of admin account

6. Copy alert.yml into folder '/iothub/monitor/prometheus'

7. Copy prometheus.yml to folder '/iothub/monitor/prometheus'
1.2 Configure pushURLs
Configure all pushxxxURLs in the yml file.1.3 Start iothub service
Start iothub service with command 'docker-compose up -d'1.4 Open grafana in browser
http://{ip}:3000

Account: admin

Password(default): 123456
1.5 Add datasource
Configuration --> Add data source --> Prometheus --> Change URL to: http://prometheus:9090 --> Save&test1.6 Import IotHub_monitor
Click '+' --> Import --> Copy the json content from 'iothub_monitor.json' to 'Import via panel json' --> Load --> choose 'Prometheus' --> Import2 Media Support SSL
2.1 Get Certificate
If you haven't purchased a domain name yet, you can use Self-signed Certificate to test
If you have purchased a domain name, you can choose to apply for a free certificate for your domain name
2.1.1 Self-signed Certificate
1. Generate private key
openssl genrsa -out server.key 20482. Create a signature request file
openssl req -new -key server.key -out server.csrNote: Need to input domain name(Common Name (eg. server FQDN(Fully Qualified Domain Name) or YOUR name)):
Country Name (2 letter code) [AU]:cn
State or Province Name (full name) [Some-State]:gd
Locality Name (eg, city) []:sz
Organization Name (eg, company) [Internet Widgits Pty Ltd]:company
Organizational Unit Name (eg, section) []:section
Common Name (e.g. server FQDN or YOUR name) []:test.com
Email Address []:xxx@qq.com

Please enter the following 'extra' attributes
to be sent with your certificate request
A challenge password []:
An optional company name []:xxx
3. Self-signed signature, generate public key (10 year validity)
openssl x509 -req -days 3650 -in server.csr -signkey server.key -out server.crt4. Merge public and private keys
cat server.crt server.key > ./ssl.pem2.1.2 Apply for a Certificate
Take Alibaba Cloud as an example:
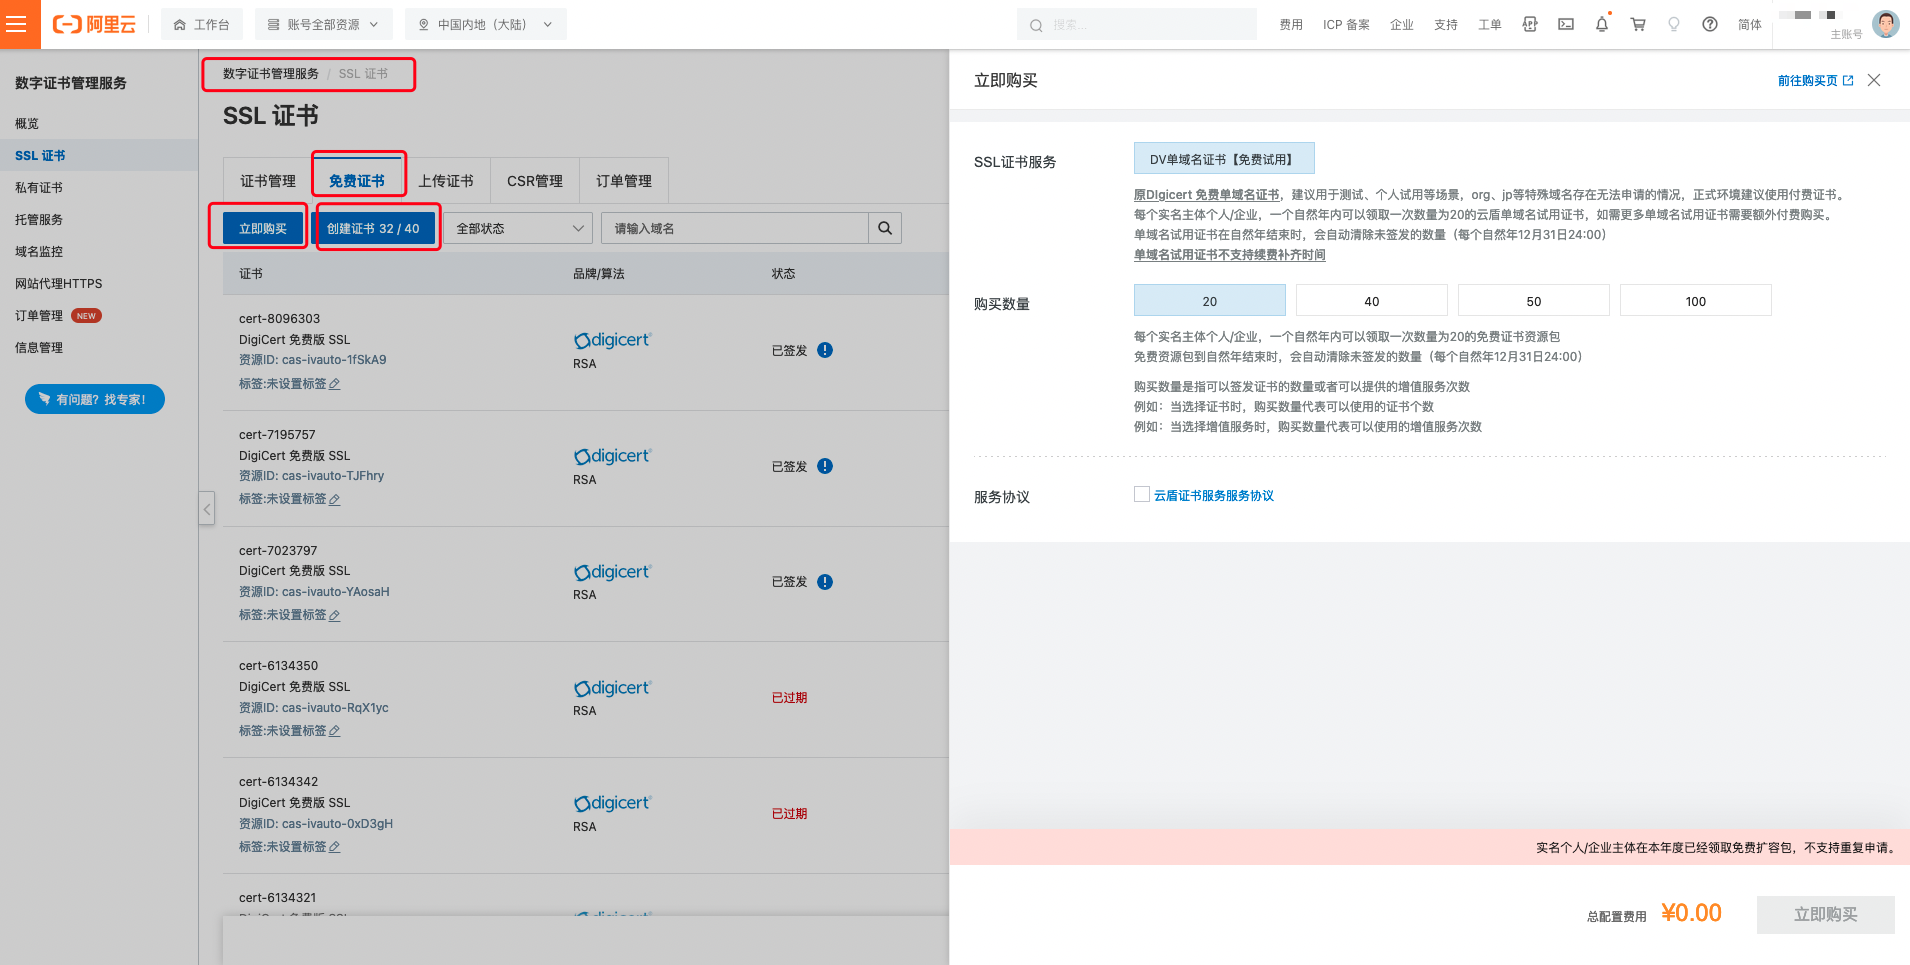
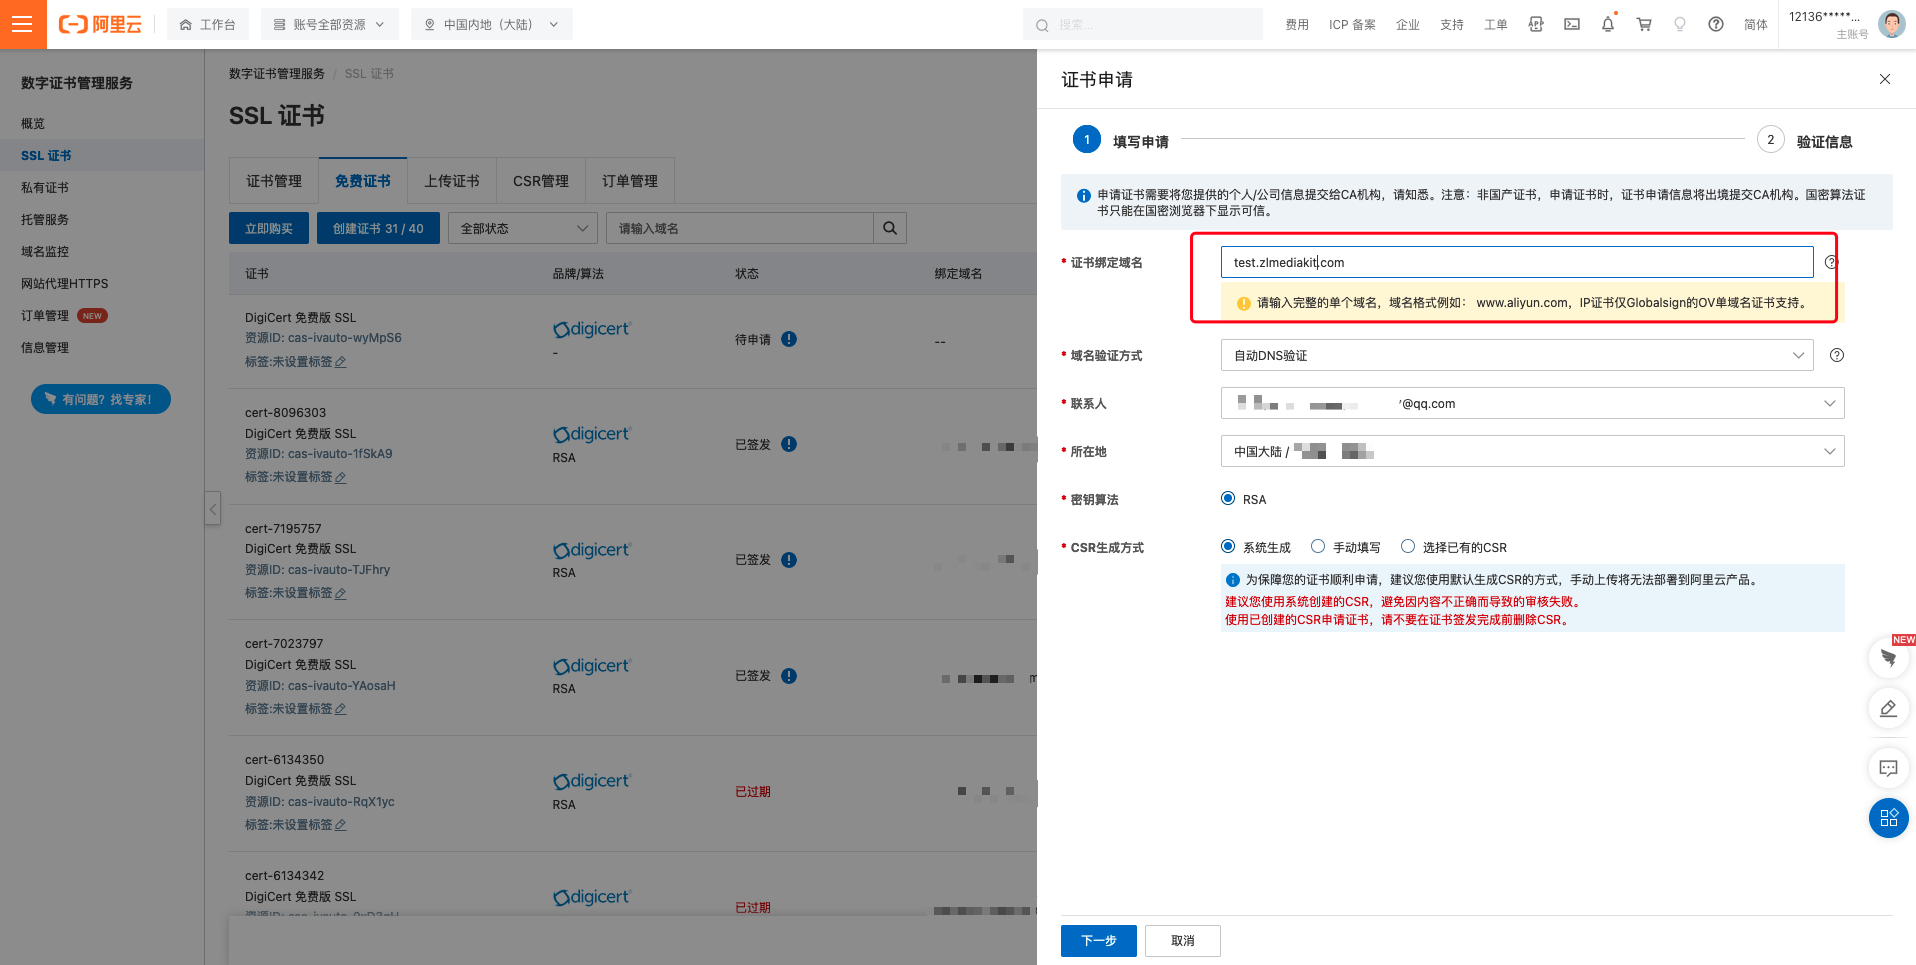
1. After applying for the free certificate quota, you can click on the 'Generate Certificate' button and enter your domain name on the pop-up page:
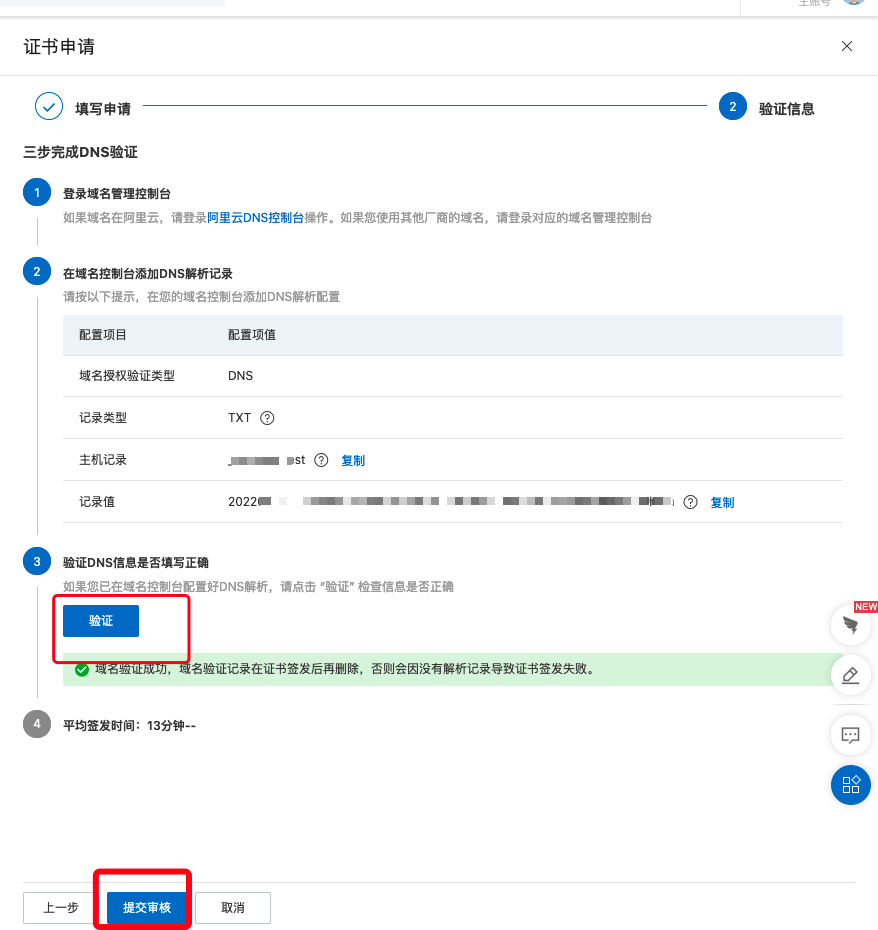
2. Click 'Next' and submit for review
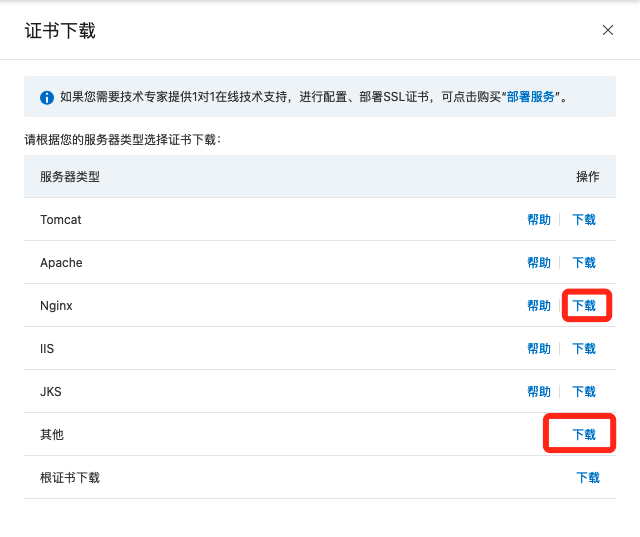
3. Download certificate

4. Choose to download in 'Nginx' or the other types (All will get the same type of SSL certificate)
5. The downloaded and decompressed file are as follow

6. The .key file is a private key, the .pem file is a public key. Both can be opened using a text editor. They are base64 encoded strings, and when the two strings are concatenated together, they are the supported certificate file types
bash
#Enter into the folder
cd 8516590_test.zlmediakit.com_nginx

#Concatenate the private key and the public key
cat 8516590_test.zlmediakit.com.key 8516590_test.zlmediakit.com.pem > default.pem
2.2 Configure IoTHub
- 1. Add ports
- 2. Mount certificate
docker-compose.yml file:
  iothub-media:
    restart: always
    container_name: iothub-media
    image: hb.jimiops.top/iothub/jimi-media:5.0.10
    deploy:
      resources:
         limits:
            cpus: '2'
            memory: 4G
         reservations:
            memory: 2G
    ports:
      - "8881:8880"
      - "1936:1935"
      - "10002:10000"
      - "10003:10001"
      - "19350:19350"(Add port for RTMPS protocol)
      - "8890:8890"(Add port for HTTPS protocol)
    environment:
      - newImeiRule=true
    volumes:
      - "/iothub/iothub-media/log:/log"
      - "/iothub/license/jimi-license.lic:/jimi-license.lic"
      - "Absolute path for storing certificates(Eg.:/test/test.p12):/ssl.p12"
Note:
- The certificate can be in .pem format or .p12 format
2.3 Pull Stream with SSL
2.3.1 JIMI Protocol Stream
- Pull Live Stream with SSL
bash
#switch to integration mode
COREKITSW,0

# Change the http storage server
UPLOAD,{server Domain}:23010/upload

# Change the rtmp server,
RSERVICE,rtmp://{server Domain}:1936/live

# Change the gateway server
SERVER,1,{server Domain}},21100

# Send a command with `cmdContent` setted as "RTMP,ON,INOUT" via API 128
Request API: http://{server Domain}:10088/api/device/sendInstruct

# Pull Live stream URL
https://{server Domain}:8890/live/{Channel ID}/{Device IMEI}.flv
rtmps://{server Domain}:19350/live/{Channel ID}/{Device IMEI}- Pull History Stream with SSL
https://{server Domain}:8890/live/{Device IMEI}.flv(SSL)
2.3.2 JT/T Protocol Stream
Pull Live Stream with SSL
https://{Server Domain Name}:8890/{Channel ID}/{Device IMEI}.flvrtmps://{server Domain}:19350/live/{Channel ID}/{Device IMEI}e.g.
https://jimiiothub.com:8890/3/868120303960873.flvPull History Stream with SSL
https://{Server Domain Name}:8890/{Channel ID}/{Device IMEI}.history.flvrtmps://{server Domain}:19350/{Channel ID}/{Device IMEI}.historye.g.
https://jimiiothub.com:8890/1/868120303960873.history.flv
2.3.3 Device Intercom(JT/T)
Develop a service that collects audio data and pushes it to the server via rtmp/rtp protocols.
Request API(proNo: 128) and issue the command: {"startTalkURL": "{URL}"} to notify the device to pull the stream to your specified address.
E.g. Intercom function
API post address:
http://ip:port/api/device/sendInstruct
| Parameters | Description |
|---|---|
| ip | The IP address of your Iothub service |
| port | IoTHub instruction port(9080/10088) |
cmdContent in the request body: [startLiveURL, Schema/ip:port/channel/IMEI](startLiveURL,Schema/ip: port/channel/IMEI)
See the table below for parameters of cmdContent
| Parameters | Description |
|---|---|
| scheam | Stream media protocol,Default: rtmp |
| ip | IP address of the stream media, that is the address that you push/pull your data stream. |
| port | The rtmp port number of the stream media |
| channel | Channel No. Default: 16 |
| IMEI | Device IMEI |
e.g. Send an instruction to a server with ip: 120.78.224.93, port: 1936,device IMEI: 869247060001549
API instruction : https://120.78.224.93:1936/api/device/sendInstruct
Request Body
json
{
  "deviceImei": "000105042285948",
  "cmdcontent": "startLiveURL: rtmp: //120.78.224.93: 1936/live/test",
  "serverFlagId": "0",
  "proNo": "128",
  "platform": "web",
  "requestId": "12345",
  "cmdType": "normallns",
  "offlineFlag": "0",
  "timeOut": "4",
  "token": "123"
}
Response Body
json
{
  "code": 0,
  "msg": "success",
  "data": {
    "_code": "100",
    "_imei": "862708042244652",
    "_content": "{\"startLiveURL\": \"rtmp: //120.78.224.93: 1936/live/test\"}",
    "_msg": "Command communication successful response",
    "_serverFlagId": "0"
  }
}- API(proNo: 128) and issue the command: {"stopTalkURL": "{URL}"} to notify the device to stop streaming.
3 High Avaliability (HA)
3.1 Overview
HA solution only supports customers over
3,000+DVR and100,000+tracker devices
High availability (HA) is the elimination of single points of failure through a multi-node deployment scheme. enabling applications to continue running even if one of the IT components it depends on, such as a server, fails.
IoTHub currently provides an easy-to-use single-node installation method, which allows you to quickly start IoTHub services. However, the availability of the single-node solution and the load capacity of a single node may become bottlenecks as the business grows.
High availability(HA) clusters provide better horizontal scalability by distributing loads across multiple nodes. This horizontal scaling solution means that you can cluster with multiple servers and distribute pressure to multiple cluster nodes. In this case, you can integrate in more IoT devices If you need high availability and horizontal expansion, you can refer to this chapter.
Whether it is HA or Scaling, its implementation is cluster deployment. Therefore, the following description will focus on the solution of cluster deployment.
3.2 Cluster Deployment Solution
Our cluster solution is ready to support gateway multi-node deployment and external Kafka/Redis middleware.
In addition, Server Load Balancing (SLB) is introduced between devices and gateways to achieve load balancing. Load balancing refers to efficiently distributing incoming network traffic across a group of backend servers. SLB provides network services and content delivery by using a series of load balancing algorithms. It prioritizes responses to the specific requests from clients over the network.
The overall architecture of IoT Hub based on this solution is as follows:
.                ----------------
                 | Media Server |------------------>------------------------------|
                 ----------------                                                 |
                   /                                                              |
[Device 1]-\      /              /---[GW Node1]--\                                |
            \    /              /                 \                               |
[Device 2]---\  /              /  ---[GW Node2]-->-[Kafka*] -- [Data]--[API]---[SaaS]
              \----------     /                     /   \                         /
               |  SLB   |-->--\       ...          /     \---- [GW-Router] ------/
 ...          /----------      \                  /               /
             /                  \ ---[GW NodeN]--/         ------/
[Device N]--/                                             /
                                                   \     /
                                                    \   /
                                                     \ /
                                                      V
                                                  ----------
                                                  | Redis* |
                                                  ----------
There will be multiple docker-compose files. Some are responsible for gateway node deployments, while others are responsible for the rest of the service node deployments.
Please provide your business needs to our customer service to get a better solution!
3.2.1 Gateway Cluster
You can deploy multiple gateway nodes to support more devices. In the docker-compose file of the gateway node, it is necessary to modify the connection information of Redis, Kafka and Router.
yml
version: '3'
services:
  tracker-gate-v1:
    restart: always
    # container_name: (Default: tracker-gate-v1)
    container_name: tracker-gate-v1
    image: hb.jimiops.top/iothub/tracker-gate-v1:xxxxxxxx
    ports:
      # The public network port on which the service listens(Default: 21100)
      - '{Port}:21100'
    volumes:
      # Path to store the license file(e.g.:/iothub/license/)
      - '{License Path}:/app/tracker-gate-v1/conf/license'
      # Path to store the service log(e.g.:/iothub/tracker-gate-v1/logs)
      - '{Log Path}:/app/tracker-gate-v1/logs'
    environment:
      # Unique gateway ID
      - gateId=tracker-gate-v1
      - routeHost=router
      # User-defined Redis IP
      - redisHost={Redis IP}
      # Redis Port(Default: 6379)
      - redisPort={Redis Port}
      - redisPass={Redis Password}
      # User-defined Kafka IP:Port(Example:127.0.0.1:9092)
      - kafkaHost={Kafka IP:Port}
      - kafkaEnable=true
  jimi-gateway-v541h:
    restart: always
    # container_name: (Default: jimi-gateway-v541h)
    container_name: jimi-gateway-v541h
    image: hb.jimiops.top/iothub/tracker-gate-v541h:xxxxxxxx
    ports:
      # The public network port on which the service listens (Default: 31506)
      - '{Port}:31506'
    volumes:
      # Path to store the license file(e.g.:/iothub/license/)
      - '{License Path}:/app/tracker-gate-v541h/conf/license/'
      # Path to store the service log(e.g.:/iothub/tracker-gate-v541h/logs)
      - '{Log Path}:/app/tracker-gate-v541h/logs'
    environment:
      # Unique gateway ID
      - gateId=gate-541h
      - routeHost=router
      # User-defined Redis IP
      - redisHost={Redis IP}
      # Redis Port(Default: 6379)
      - redisPort={Redis Port}
      - redisPasswd={Redis Password}
      # User-defined Kafka IP:Port(Example:127.0.0.1:9092)
      - kafkaHost={Kafka IP:Port}
      - kafkaConsumerGroup=v541h-group
  jimi-gateway-450:
    restart: always
    # container_name: (Default: jimi-gateway-450)
    container_name: jimi-gateway-450
    image: hb.jimiops.top/iothub/tracker-gate-iothub-c450:xxxxxxxx
    ports:
      # The public network port on which the service listens (Default: 21122)
      - '{Port}:21121'
    volumes:
      # Path to store the license file(e.g.:/iothub/license/)
      - '{License Path}:/app/tracker-gate-iothub-c450/conf/license'
      # Path to store the service log(e.g.:/iothub/gate-iothub-c450/logs)
      - '{Log Path}:/app/tracker-gate-iothub-c450/logs'
    environment:
      # Unique gateway ID
      - gateId=jimi-gateway-450-21122
      - routeHost=router
      # User-defined Redis IP
      - redisHost={Redis IP}
      # Redis Port(Default: 6379)
      - redisPort={Redis Port}
      - redisPasswd={Redis Password}
      # User-defined Kafka IP:Port(Example:127.0.0.1:9092)
      - kafkaHost={Kafka IP:Port}
      - kafkaConsumerGroup=data-128
      - kafkaEnable=true
      - connectTimeout=5
      - readTimeOut=5
      - writeTimeOut=5
      - newImeiRule=true
  jimi-gateway-450-869:
    restart: always
    # container_name: (Default: jimi-gateway-450-869)
    container_name: jimi-gateway-450-869
    image: hb.jimiops.top/iothub/tracker-gate-iothub-c450:xxxxxxxx
    ports:
      # The public network port on which the service listens (Default: 21121)
      - '{Port}:21121'
    volumes:
      # Path to store the license file(e.g.:/iothub/license/)
      - '{License Path}:/app/tracker-gate-iothub-c450/conf/license'
      # Path to store the service log(e.g.:/iothub/gate-iothub-c450-869/logs)
      - '{Log Path}:/app/tracker-gate-iothub-c450/logs'
    environment:
      # Unique gateway ID
      - gateId=jimi-gateway-450
      - routeHost=router
      # User-defined Redis IP
      - redisHost={Redis IP}
      # Redis Port(Default: 6379)
      - redisPort={Redis Port}
      - redisPasswd={Redis Password}
      # User-defined Kafka IP:Port(Example:127.0.0.1:9092)
      - kafkaHost={Kafka IP:Port}
      - kafkaConsumerGroup=data-128
      - kafkaEnable=true
      - connectTimeout=5
      - readTimeOut=5
      - writeTimeOut=5
      - newImeiRule=false
In front of all gateways, please use a 4-Layer network load balancer (such as Ngnix, or SLB products of cloud vendors) as a unified entrance to distribute network traffic to all gateways. All terminal devices access the platform through a unified load balancing IP and port.
3.2.2 HA of Kafka and Redis
IoTHub has now integrated the docker images of Kafka and Redis. However, if you have built your own Kafka or Redis clusters, you can more flexibly control the availability of these clusters.
- If you use self-built Kafka, the recommended version is 3.0.1;
- If you use self-built Redis, the recommended version is 5.0;
- For other versions of Kafka/Redis, it needs to be fully tested and verified before going online.
When using self-built Kafka, you need to modify the following configurations in docker-compose.yml:
yml
# kafka:
#   restart: always
#   container_name: kafka
#   image: hb.jimiops.top/iothub/jimi-kafka:5.0.1
#   ports:
#     - "9092:9092"
#   volumes:
#     - "/iothub/kafka:/kafka"
#   environment:
#     KAFKA_ADVERTISED_HOST_NAME: kafka
#     KAFKA_ZOOKEEPER_CONNECT: "zookeeper:2181"
#     KAFKA_ADVERTISED_PORT: 9092
#     KAFKA_PORT: 9092
#     KAFKA_LOG_RETENTION_HOURS: 120
#     KAFKA_MESSAGE_MAX_BYTES: 10000000
#     KAFKA_REPLICA_FETCH_MAX_BYTES: 10000000
#     KAFKA_GROUP_MAX_SESSION_TIMEOUT_MS: 60000
#     KAFKA_NUM_PARTITIONS: 10
#     KAFKA_DELETE_RETENTION_MS: 1000
#     HOSTNAME: kafka
#   depends_on:
#     - zookeeper
#   networks:
#     - backend
redis:
  restart: always
  container_name: redis
  image: hb.jimiops.top/iothub/jimi-redis:5.0.1
  ports:
    - '6379:6379'
  volumes:
    - '/iothub/redis:/data'
  command: redis-server --requirepass jimi@123 --appendonly yes
  networks:
    - backend
# zookeeper:
#   restart: always
#   container_name: zookeeper
#   image: hb.jimiops.top/iothub/jimi-zookeeper:5.0.1
#   ports:
#     - "2181:2181"
#   volumes:
#     - "/iothub/zookeeper/data:/data"
#     - "/iothub/zookeeper/datalog:/datalog"
#   networks:
#     - backend
For all applications that rely on kafaka, you need to modify the IP:PORT of the kafkaHost in the environment. The applications involved are as follows:
| No. | Services |
|---|---|
| 1 | tracker-instruction-server |
| 2 | msg-dispatch-iothub |
| 3 | tracker-gate-v1 |
| 4 | jimi-gateway-v541h |
| 5 | jimi-gateway-450 |
| 6 | jimi-gateway-450-869 |
| 7 | jimi-data |
| 8 | jimi-tracker-gate-upload |
| 9 | jimi-tracker-upload-process |
When using self-built Redis, you need to modify the following configurations in docker-compose.yml:
yml
kafka:
    restart: always
    container_name: kafka
    image: hb.jimiops.top/iothub/jimi-kafka:5.0.1
    ports:
      - "9092:9092"
    volumes:
      - "/iothub/kafka:/kafka"
    environment:
      KAFKA_ADVERTISED_HOST_NAME: kafka
      KAFKA_ZOOKEEPER_CONNECT: "zookeeper:2181"
      KAFKA_ADVERTISED_PORT: 9092
      KAFKA_PORT: 9092
      KAFKA_LOG_RETENTION_HOURS: 120
      KAFKA_MESSAGE_MAX_BYTES: 10000000
      KAFKA_REPLICA_FETCH_MAX_BYTES: 10000000
      KAFKA_GROUP_MAX_SESSION_TIMEOUT_MS: 60000
      KAFKA_NUM_PARTITIONS: 10
      KAFKA_DELETE_RETENTION_MS: 1000
      HOSTNAME: kafka
    depends_on:
      - zookeeper
    networks:
      - backend
  # redis:
  #   restart: always
  #   container_name: redis
  #   image: hb.jimiops.top/iothub/jimi-redis:5.0.1
  #   ports:
  #     - "6379:6379"
  #   volumes:
  #     - "/iothub/redis:/data"
  #   command: redis-server --requirepass jimi@123 --appendonly yes
  #   networks:
  #     - backend
  zookeeper:
    restart: always
    container_name: zookeeper
    image: hb.jimiops.top/iothub/jimi-zookeeper:5.0.1
    ports:
      - "2181:2181"
    volumes:
      - "/iothub/zookeeper/data:/data"
      - "/iothub/zookeeper/datalog:/datalog"
    networks:
      - backend
For all applications that rely on Redis, you need to modify the corresponding configurations in environment, the details are as follows:
Involved configurations:
| No. | Configurations | Changes |
|---|---|---|
| 1 | redisHost | Redis IP |
| 2 | redisPasswd | Redis Password |
| 3 | redisPort | Redis Password |
Involved applications:
| No. | Services |
|---|---|
| 1 | tracker-instruction-server |
| 2 | msg-dispatch-iothub |
| 3 | tracker-gate-v1 |
| 4 | jimi-gateway-v541h |
| 5 | jimi-gateway-450 |
| 6 | jimi-gateway-450-869 |
| 7 | jimi-data |
| 8 | jimi-tracker-gate-upload |
| 9 | jimi-tracker-upload-process |
If you use self-built Kafka and Redis, you can comment out the corresponding default ones: images configuration to save server resources.
yml
# #configurations can be removed:
#  kafka:
#    restart: always
#    container_name: kafka
#    image: hb.jimiops.top/iothub/jimi-kafka:5.0.1
#    ports:
#      - "9092:9092"
#    volumes:
#      - "/iothub/kafka:/kafka"
#    environment:
#      KAFKA_ADVERTISED_HOST_NAME: kafka
#      KAFKA_ZOOKEEPER_CONNECT: "zookeeper:2181"
#      KAFKA_ADVERTISED_PORT: 9092
#      KAFKA_PORT: 9092
#      KAFKA_LOG_RETENTION_HOURS: 120
#      KAFKA_MESSAGE_MAX_BYTES: 10000000
#      KAFKA_REPLICA_FETCH_MAX_BYTES: 10000000
#      KAFKA_GROUP_MAX_SESSION_TIMEOUT_MS: 60000
#      KAFKA_NUM_PARTITIONS: 10
#      KAFKA_DELETE_RETENTION_MS: 1000
#      HOSTNAME: kafka
#    depends_on:
#      - zookeeper
#    networks:
#      - backend

#  redis:
#    restart: always
#    container_name: redis
#    image: hb.jimiops.top/iothub/jimi-redis:5.0.1
#    ports:
#      - "6379:6379"
#    volumes:
#      - "/iothub/redis:/data"
#    command: redis-server --requirepass jimi@123 --appendonly yes
#    networks:
#      - backend

#  zookeeper:
#    restart: always
#    container_name: zookeeper
#    image: hb.jimiops.top/iothub/jimi-zookeeper:5.0.1
#    ports:
#      - "2181:2181"
#    volumes:
#      - "/iothub/zookeeper/data:/data"
#      - "/iothub/zookeeper/datalog:/datalog"
#    networks:
#      - backend
4 LBS Service
What is Location-Based Service (LBS)?
Location-Based Services (LBS) refer to services based on the geographical locations of a user as determined by using WiFi networks or base stations. In some specific scenarios,it is used to get devices' location data in Jimi IoT Hub. Specific scenarios include:
- A Jimi-gateway-connected device sends WiFi or LBS packets to the Jimi IoT Hub to request the location. The latter obtains the location data through the LBS service and uses the 1.3 Push GPS Data command to push the data to the SaaS platform. If the LBS service is not configured on the Jimi IoT Hub, it will be considered as a query failure and no data will be pushed to SaaS.
- A Jimi-gateway-connected device sends an LBS data packet to Jimi IoT Hub to request a location. Jimi IoT Hub gets the location data through the LBS Service and sends the data to the device. If the LBS Service is not configured on Jimi IoT Hub, the device will not receive any reply.
- A Jimi-gateway-connected device sends an LBS alarm packet to Jimi IoT Hub, which gets a location through the LBS Service and pushes a data packet that contains the device location and more to the SaaS platform using the 1.4 Push Alarm Data command. If the LBS Service is not configured on Jimi IoT Hub, the data will still be pushed to the SaaS platform. However, the longitude and latitude values carried in the data packet will be "0" and the reply received by the device will contain "LBS locating is not available right".
4.1 Request parameters
Request method
shell
GETlbs and wifi parameter must exist one
| Parameter | Type | Required | Description |
|---|---|---|---|
| imei | string | Y | Device number. Format:[0-9]{15}. Example:123456789101112 |
| token | string | Y | The token is used for LBS service authentication. Example:a3bfe487e6ae029fb02402e6cb2ceacc |
| wifi | string | N | Wifi information list. Format:(mac,accuracy|mac,accuracy...). Example:38e3c5491f9d,83|30993559bf1b,96|0f0000ea14f0,98|0f0000ea14f0,99 |
| lbs | string | N | Lbs information list. Format:[MCC(Mobile Country Code), MNC(Mobile Network Code),LAC(Location Area Code),CI(Cell Tower ID),RSSI(Signal strength)]. Example:(460,0,32920,135372804,45 | 460,0,32920,80382528,24) |
4.2 Returns the result
4.2.1 Result field
| Parameter | Type | Description |
|---|---|---|
| code | int | Status code |
| data | string | Detailed data |
| msg | string | Status code Description |
4.2.2 Code field
| Status code | Description |
|---|---|
| 0 | Operation is successful |
| 100 | Invalid request parameters |
| 101 | Invalid request token |
| 102 | The request for imei is invalid |
| 200 | Unsupported functions |
| 300 | Business exceptions |
| 400 | No data found |
4.2.3 Data field
| Parameter | Type | Description |
|---|---|---|
| accuracy | double | Positioning accuracy |
| from | string | The data returned from which vendor |
| lat | double | Latitude |
| lng | double | Longitude |
| time | long | The query time |
| type | int | Location type. 0: No location result is obtained 1: GPS positioning results 2: wifi location results 3: mixed positioning results 4: base station positioning results 5: other |
4.3 Request & Response
4.3.1 Sample request
shell
http://ip:port/loc/query?wifi=646e9783e40b%2C72%7Ce514f09fe514%2C73%7C14f09fe514f0%2C87%7C0f0000ea14f0%2C96%7Ca0e10270a0e1%2C97%7C206be7874501%2C97%7C0f0000ea14f0%2C101%7C020ac0e30700%2C102%7Ce4f3f5254d96%2C102%7C0f0000ea14f0%2C102%7C0f0000ea14f0%2C103%7C246968eeb322%2C104%7C0f0000ea14f0%2C104%7C0f0000ea14f0%2C104%7C882593032670%2C105&token=XXXXXXXXXXXXXXXXXXXXXXXX&imei=123456789101112&lbs=460%2C0%2C29511%2C137329736%2C54%7C460%2C0%2C29511%2C199143681%2C314.3.2 Sample result
shell
{
    "code": 0,
    "data": {
        "accuracy": 100,
        "from": "JIMI",
        "lat": 19.89656098707411,
        "lng": 109.52859431402238,
        "time": 1658137798732,
        "type": 4
    },
    "msg": "success"
}
4.4 Configure LBS
Locate - lbsURL in the docker-compose.yml file and replace "lbsURL" with the address of your LBS Service. Locate - lbsToken in the docker-compose.yml file and replace "lbsToken" with the authentication token of your LBS Service.
