Appearance
Testing
| Task | Description |
|---|---|
| Device Preparation | - Insert SIM & TF card - Power on device - Check device network |
| Device Connection | - Register device to IoTHub - Check device login log |
| Basic Test | - Check Device and IoTHub Connection - Check IoTHub command API (proNo. 128) - Check heartbeat/GPS/alarm push data |
| Advanced Test | - Pull/Close live video - Pull/Close historical video - Upload alarm/history video - Remote photography - Stop continuous alarms |
1 JIMI Protocol Device
1.1 Device Connection
Command delivered by the platform or SMS or TF card, gateway port 21100
bash
# 1. Configure the device works in integration mode, default is 1
COREKITSW,0

# 2. Configure the http storage server
UPLOAD,http://{User server IP}:23010/upload

# 3. Configure the RTMP server
RSERVICE,rtmp://{User server IP}:1936/live

# 4. Configure the gateway server
SERVER,0,{User server IP},21100
OR
SERVER,1,{Domain Name},21100
Note:
Reboot the device after the configuration. Once reboot done, you can start testing with IoTHub.
Check device login
Check dump.log in folder /iothub/tracker-gate-v1/logs/dump/ to see if the device has logged IoTHub via printed device IMEI. 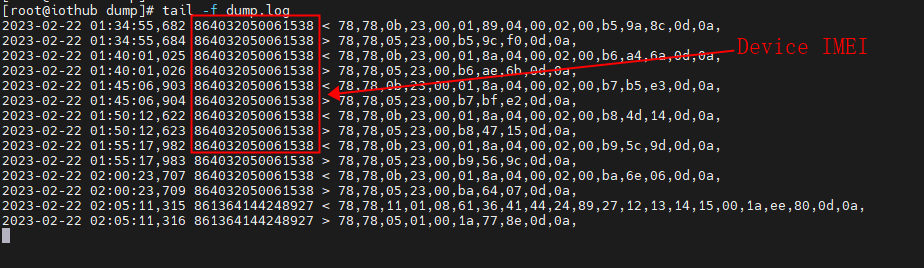
1.2 Basic Test
1.2.1 Check Connection
- Check
dump.login folder/iothub/tracker-gate-v1/logs/dump/to see if the device has logged into the IoTHub gateway. The log looks similar to the following figure.
1.2.2 Issue command
E.g. 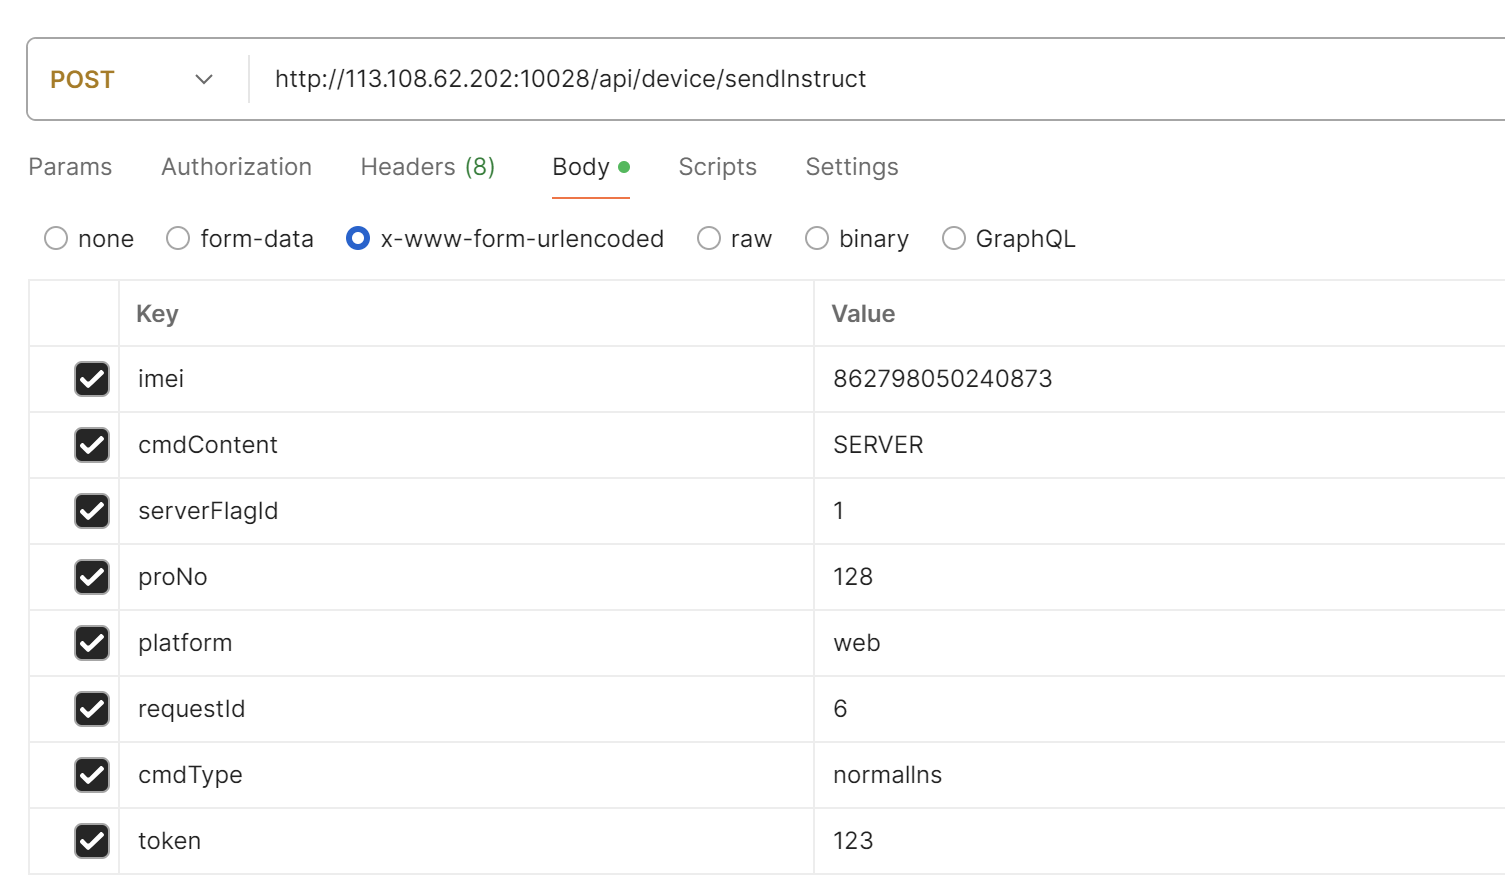
bash
curl --location 'http://113.108.62.202:10088/api/device/sendInstruct' \
--header 'Content-Type: application/x-www-form-urlencoded' \
--data-urlencode 'imei=862798050240873' \
--data-urlencode 'cmdContent=SERVER' \
--data-urlencode 'serverFlagId=1' \
--data-urlencode 'proNo=128' \
--data-urlencode 'platform=web' \
--data-urlencode 'requestId=6' \
--data-urlencode 'cmdType=normallns' \
--data-urlencode 'token=123'
1.2.3 Check push data
Check heartbeat push data
Please check heartbeat data in all.log(default path: /iothub/msg-dispatch-iothub/) with command: tail -f all.log
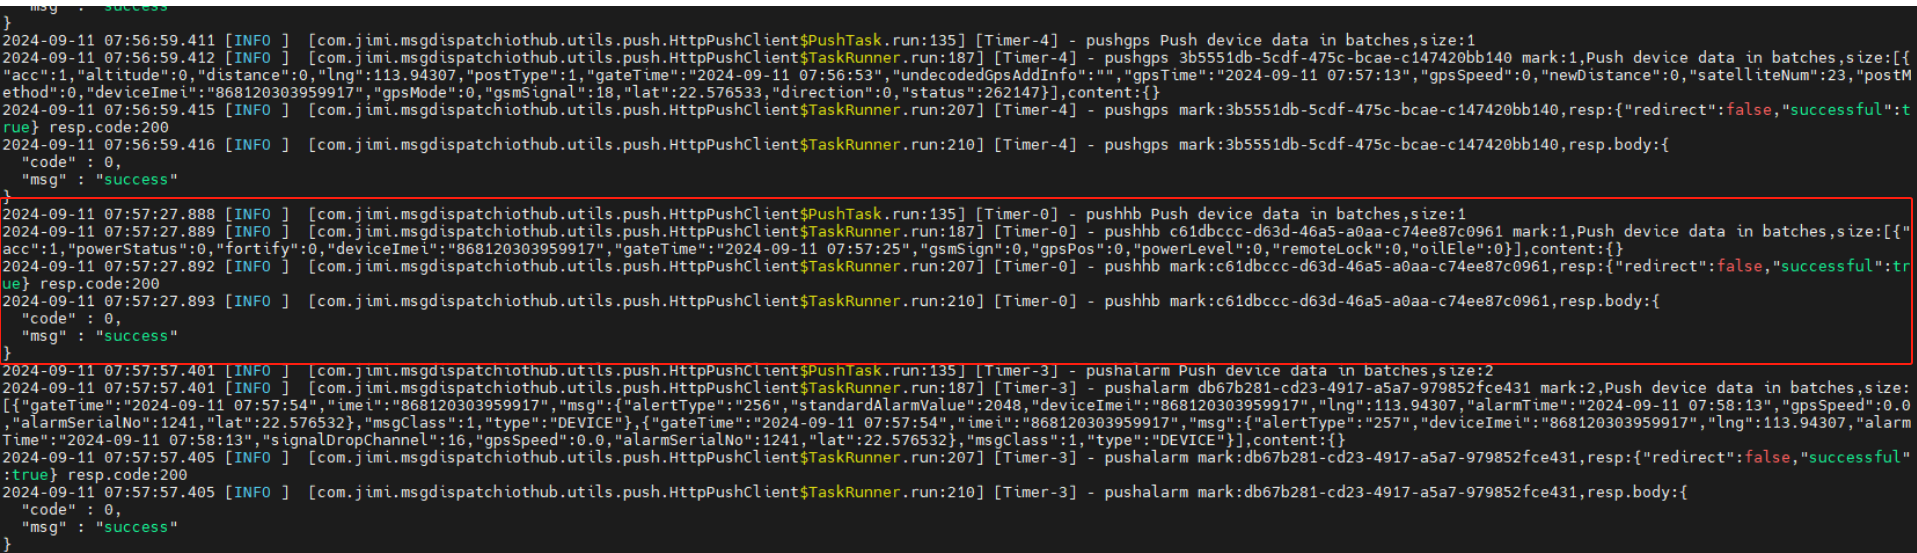
Check GPS push data
Please check GPS data in all.log(default path: /iothub/msg-dispatch-iothub/) with command: tail -f all.log
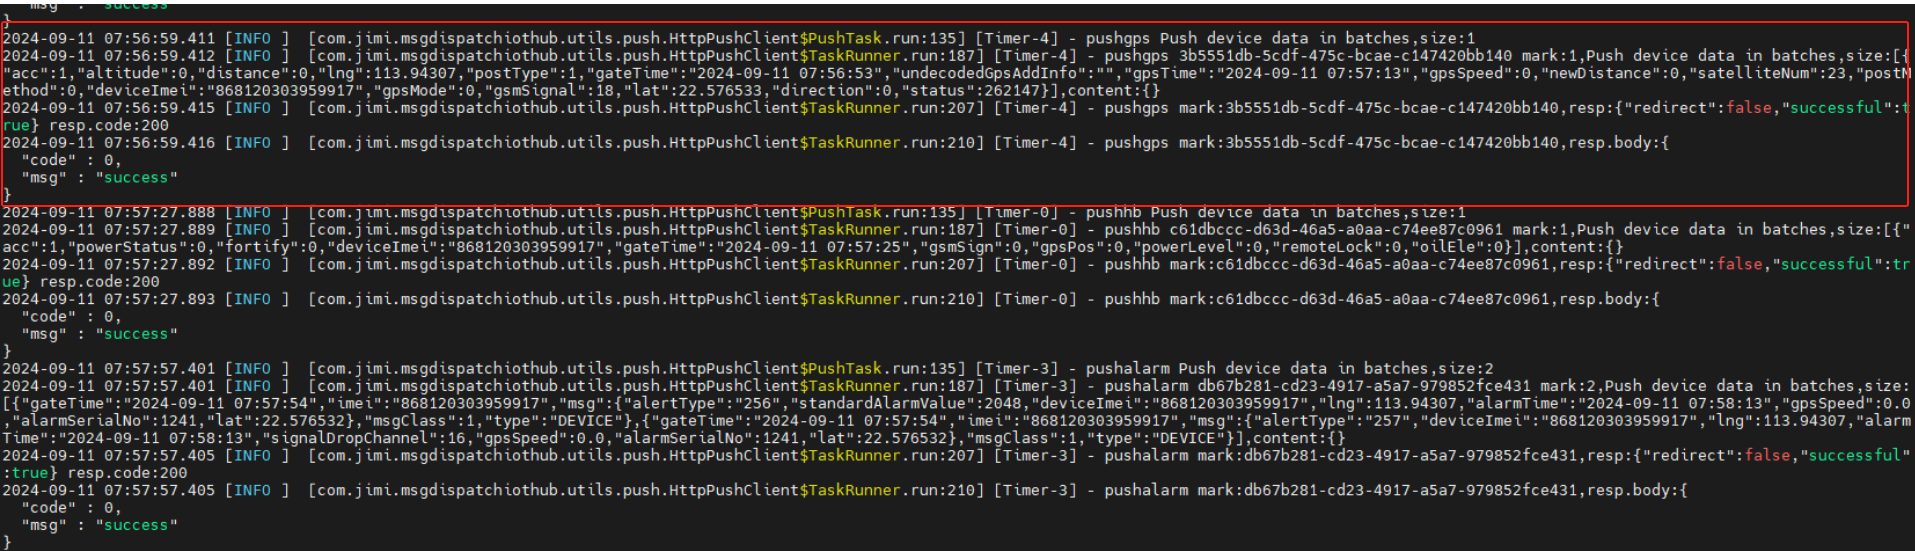
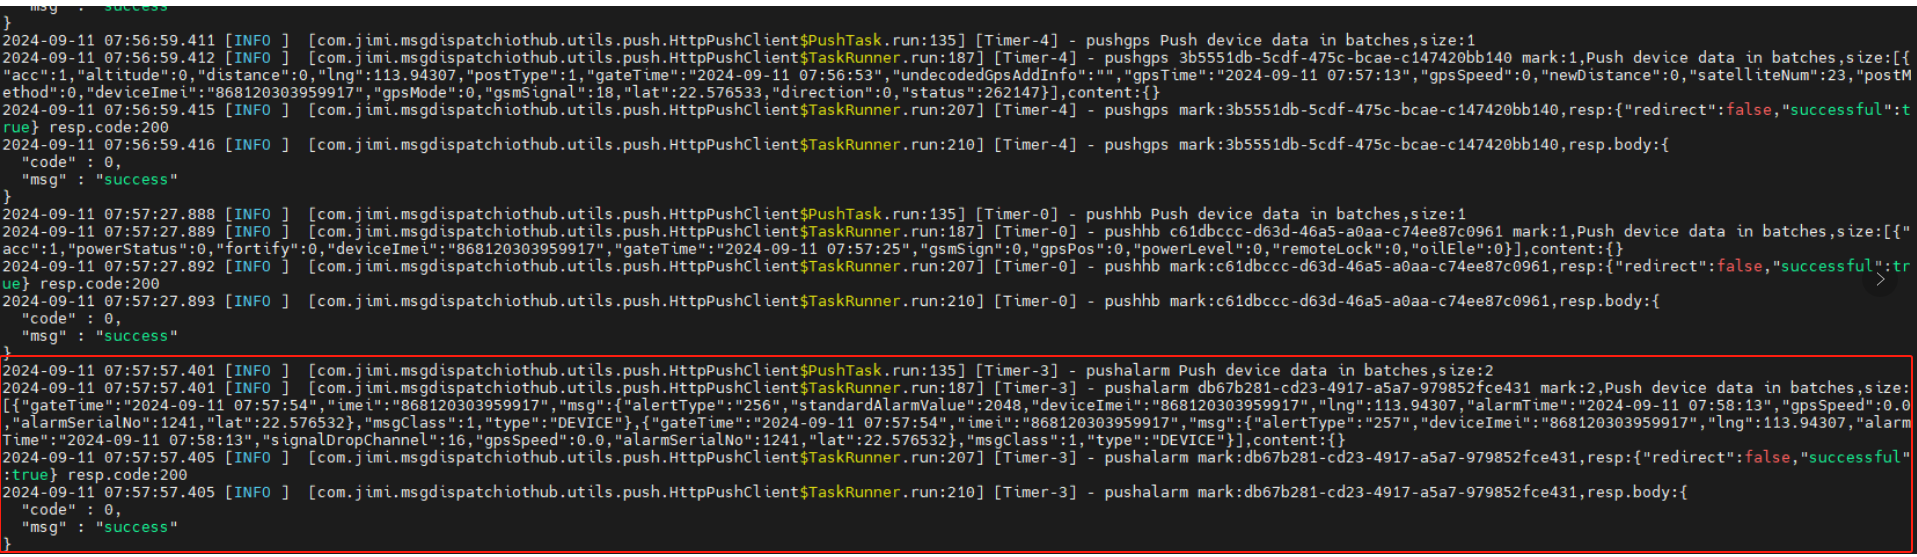
Check alert push data
Please check alert data in all.log(default path: /iothub/msg-dispatch-iothub/) with command: tail -f all.log
1.3 Advanced Test
1.3.1 Remote Image
Send a command with
cmdContentset as "Picture,in"/"Picture,out"/"Picture,inout".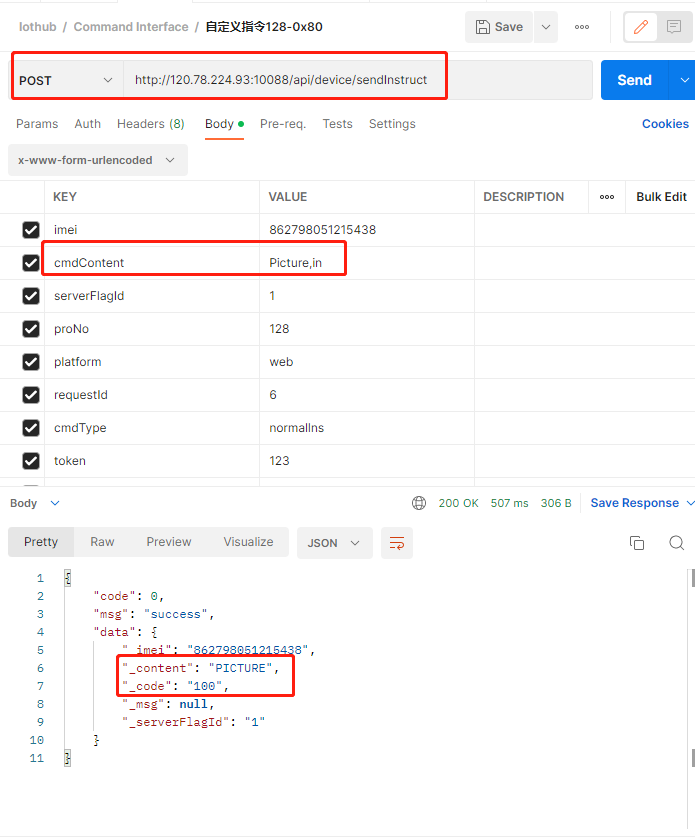
Check the image file in folder
/iothub/dvr-upolad/uploadFile.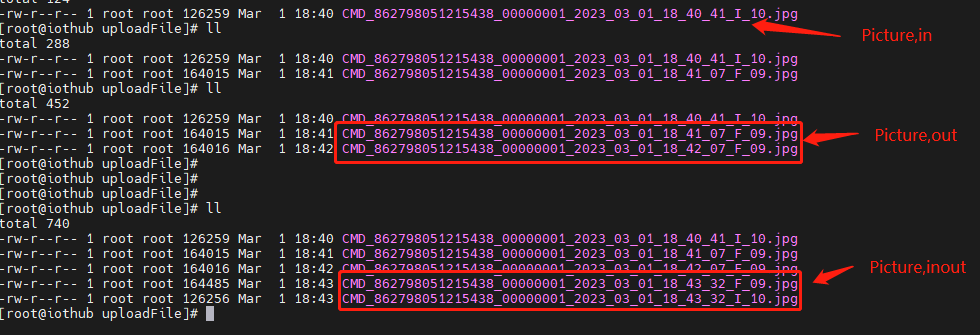
1.3.2 Remote Video
Send a command with
cmdContentsetted as "Video,out,5s".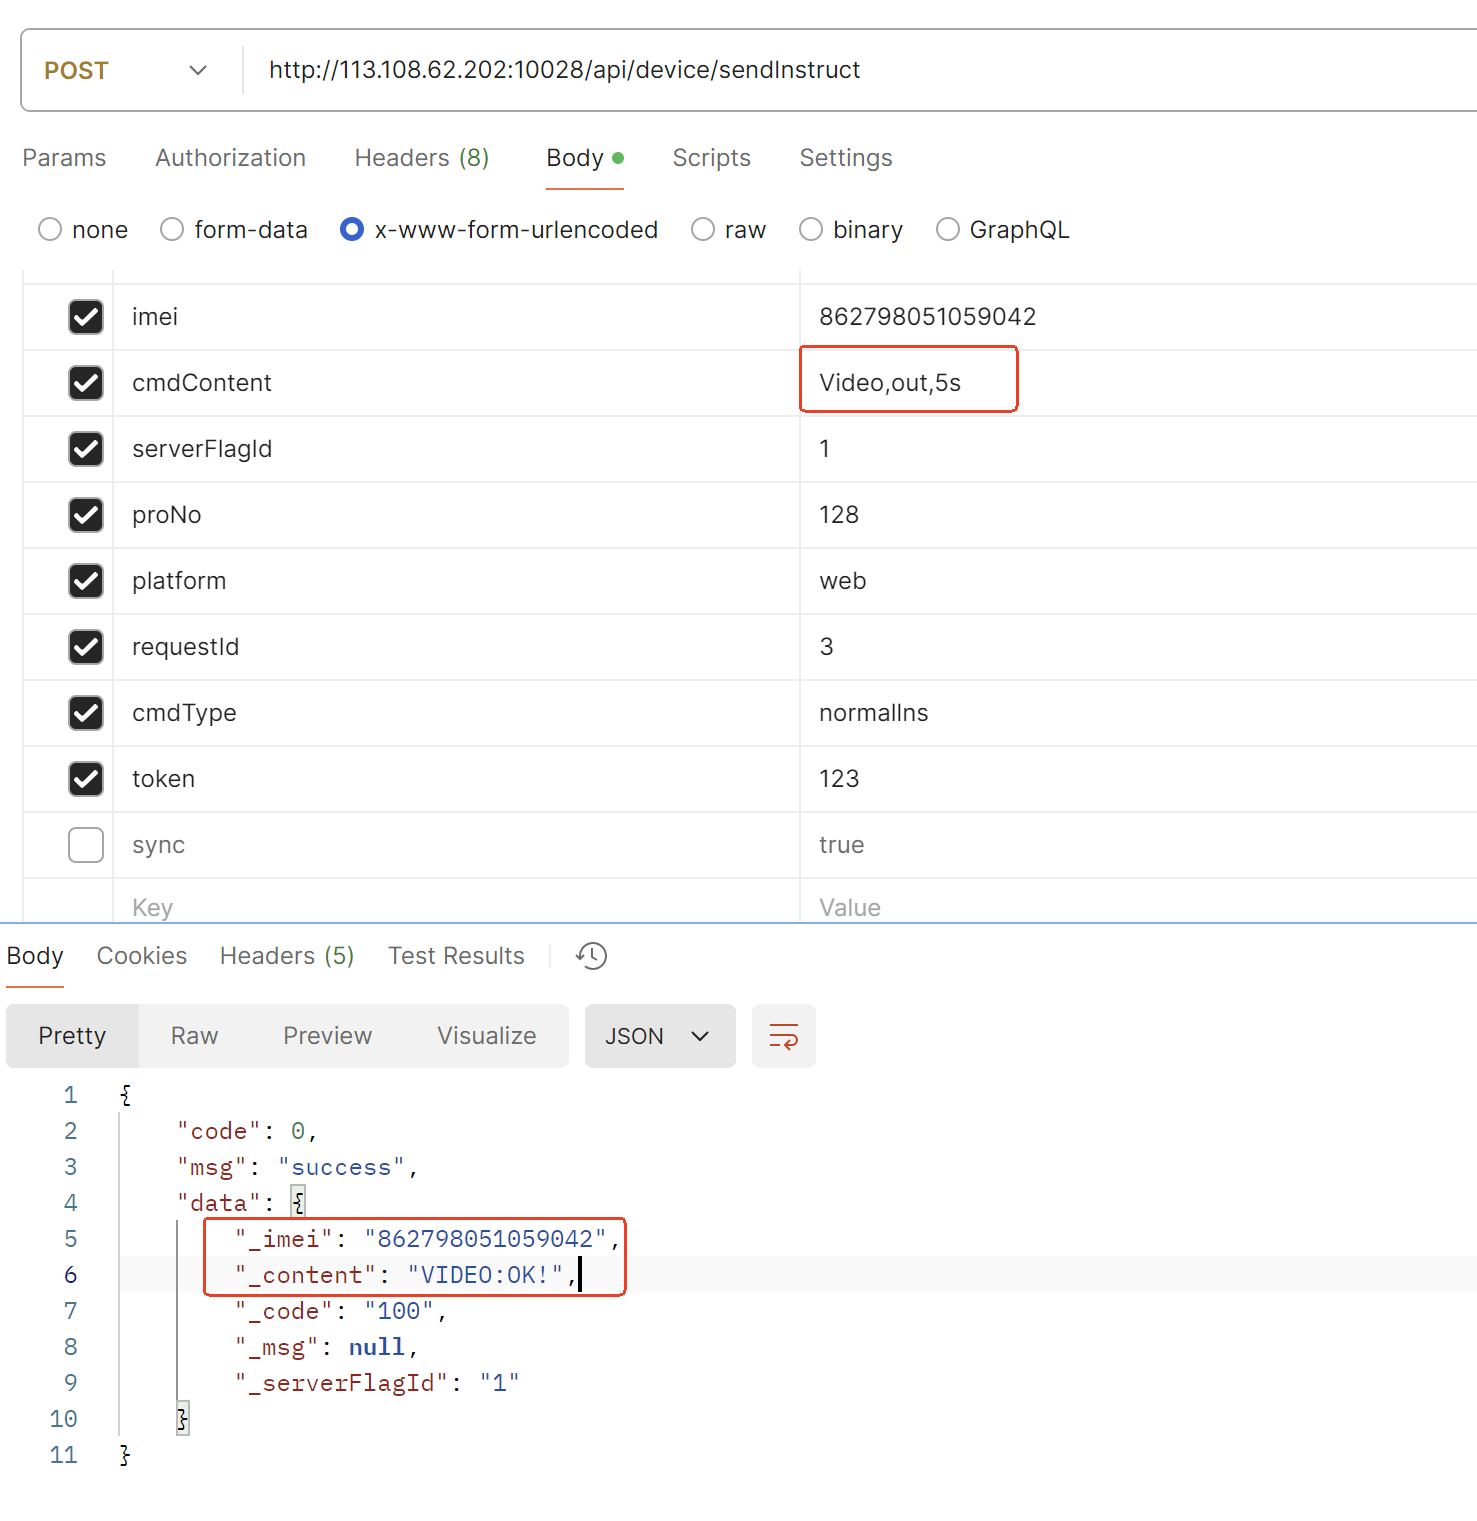
Check the video file in folder
/iothub/dvr-upolad/uploadFile.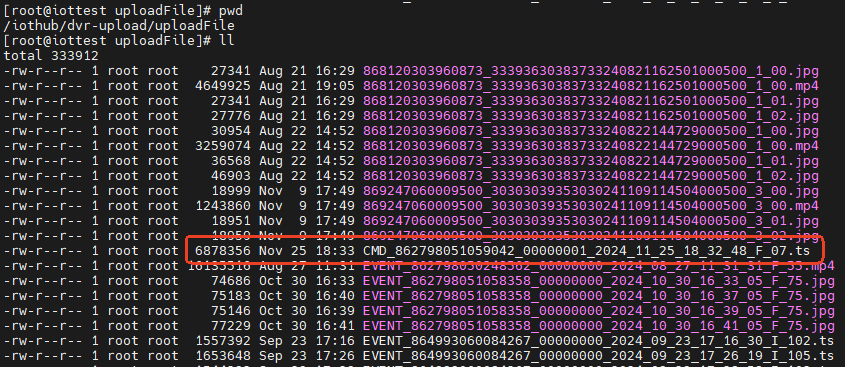
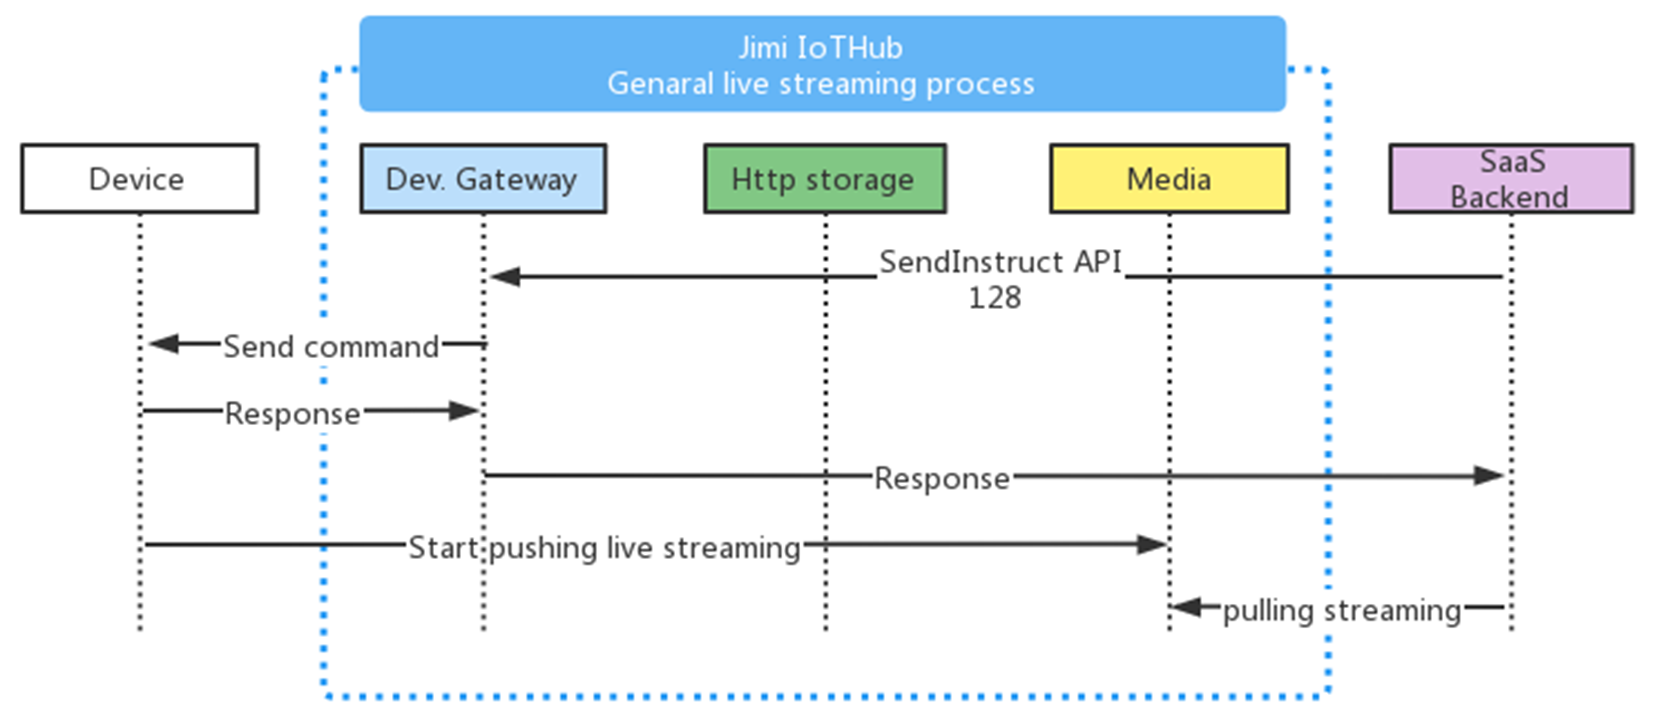
1.3.3 Push/Pull Live Stream
1.3.3.1 Push/Pull Stream Preparation
Ensure that the Media service is enabled and the external network can access its port
Ensure that the device is correctly configured with commands
Install VLC or other media players to test real-time video and check whether the device can work properly on IoTHub.
1.3.3.2 Push Live Stream
- Issue RTMP command via API(proNo. 128). Please check the command list for comamnd details.
1.3.3.3 Pull Live Stream
- Pull live stream with the corresponding video address
bash
# Configure stream pull URL
 - Pull Live Stream URL
 `rtmp://{server IP}:1936/live/{Channel ID}/{Device IMEI}`
 `http://{server IP}:8881/live/{Channel ID}/{Device IMEI}.flv`
 `http://{server IP}:8881/live/{Channel ID}/{Device IMEI}/hls.m3u8`
# Send command with `cmdContent` setted as "RTMP,ON,INOUT" via JIMI API 128
 - API: http://{Your server IP}:10088/api/device/sendInstruct
 - Live Stream command:
 `imei:{Your Device IMEI}
  cmdContent:RTMP,ON,INOUT
  serverFlagId:1
  proNo:128
  platform:web
  requestId:6
  cmdType:normallns
  token:123`
e.g.
Configure stream pull URL
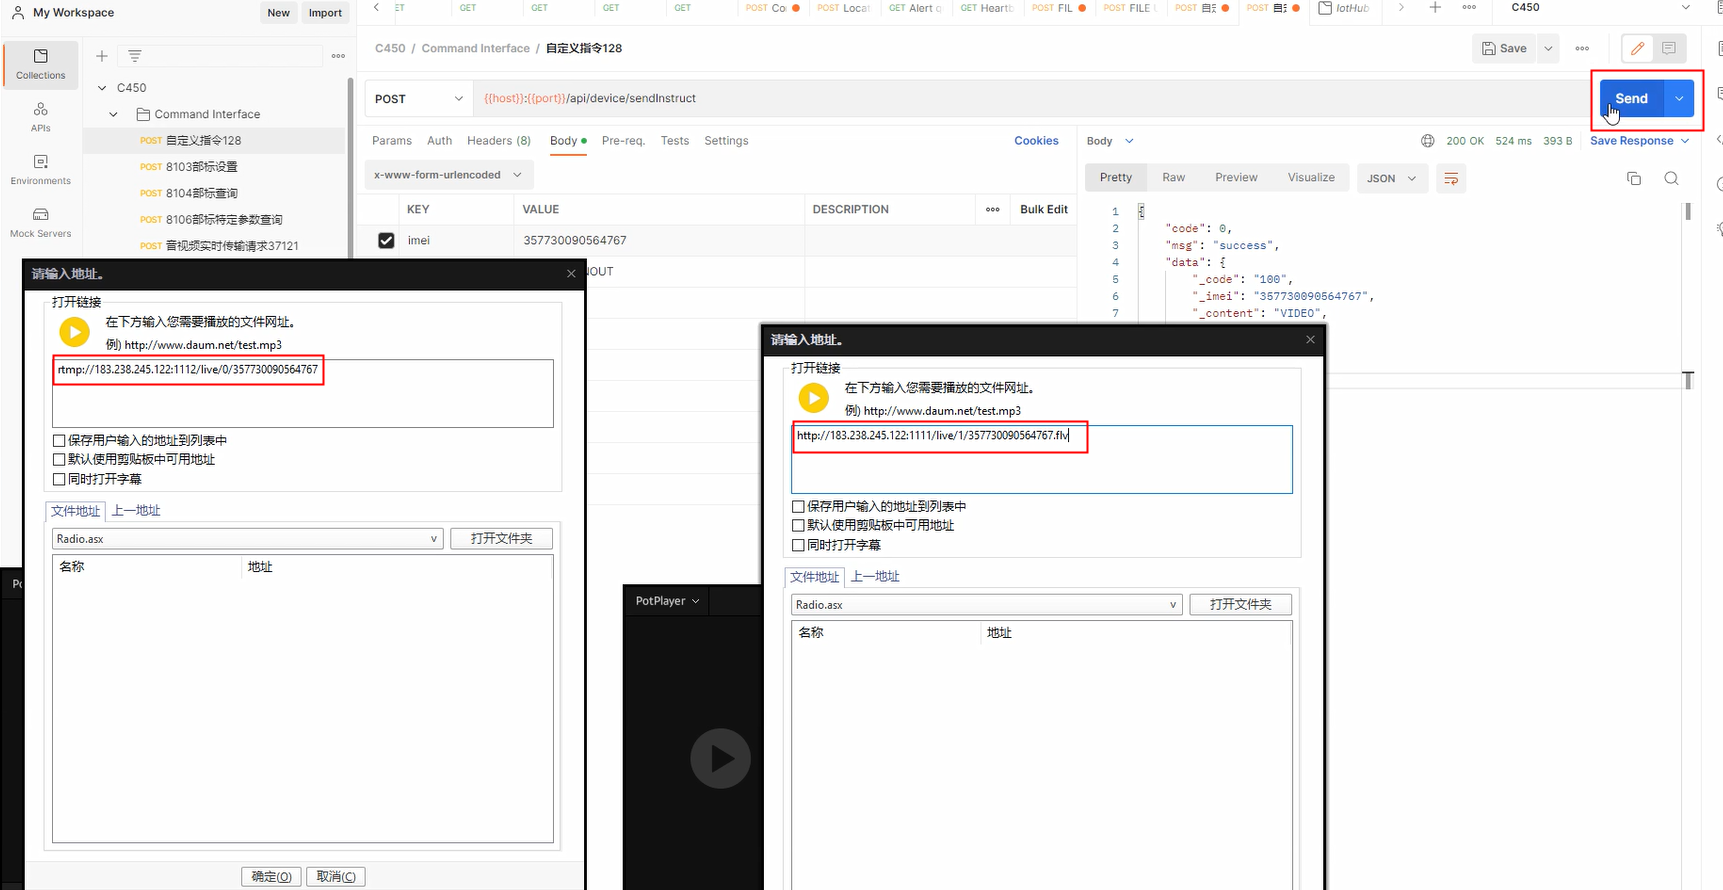
Send live stream command
cmdContent: "RTMP,ON,INOUT"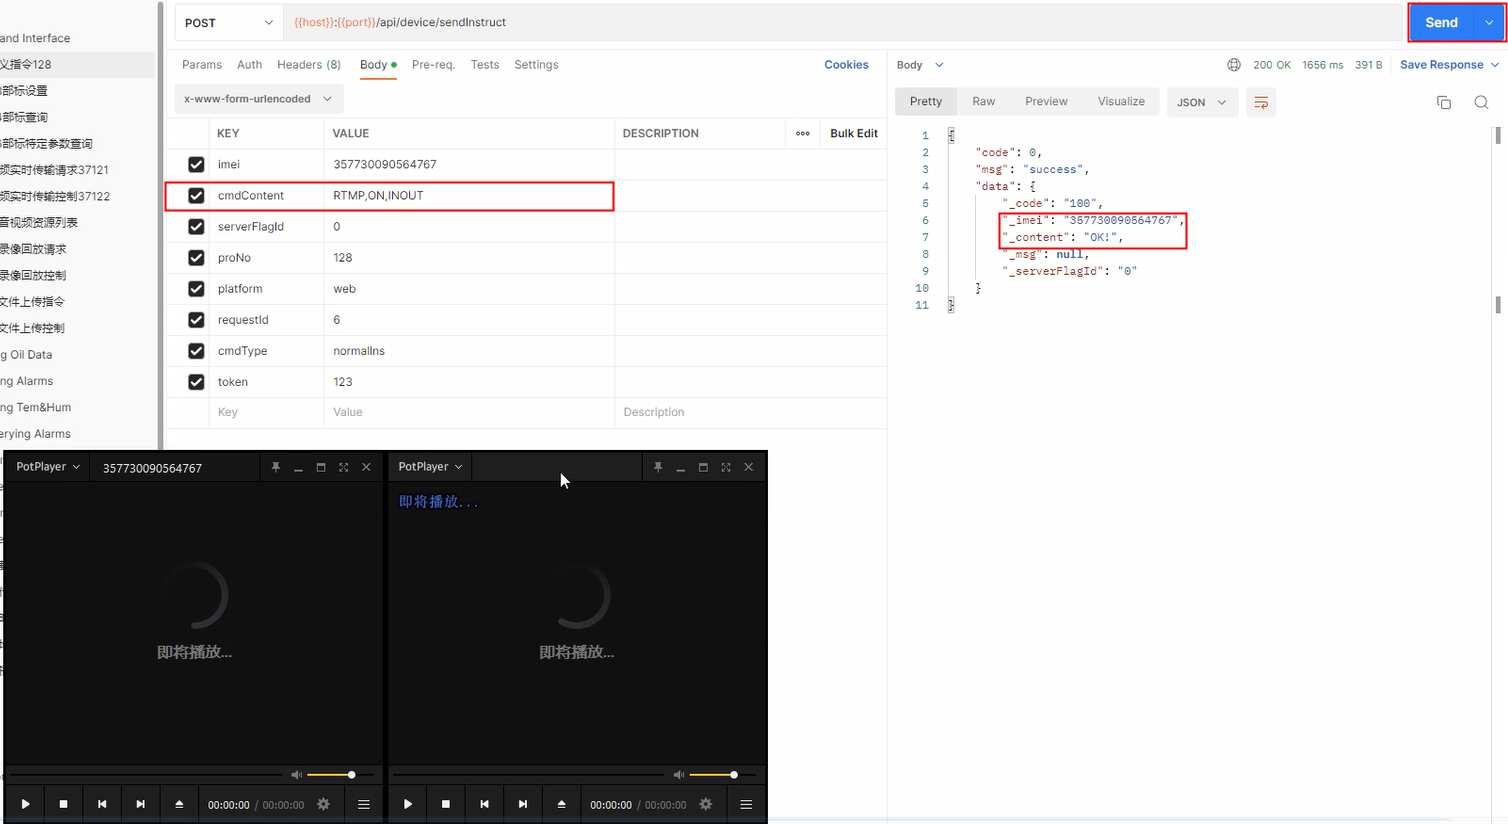
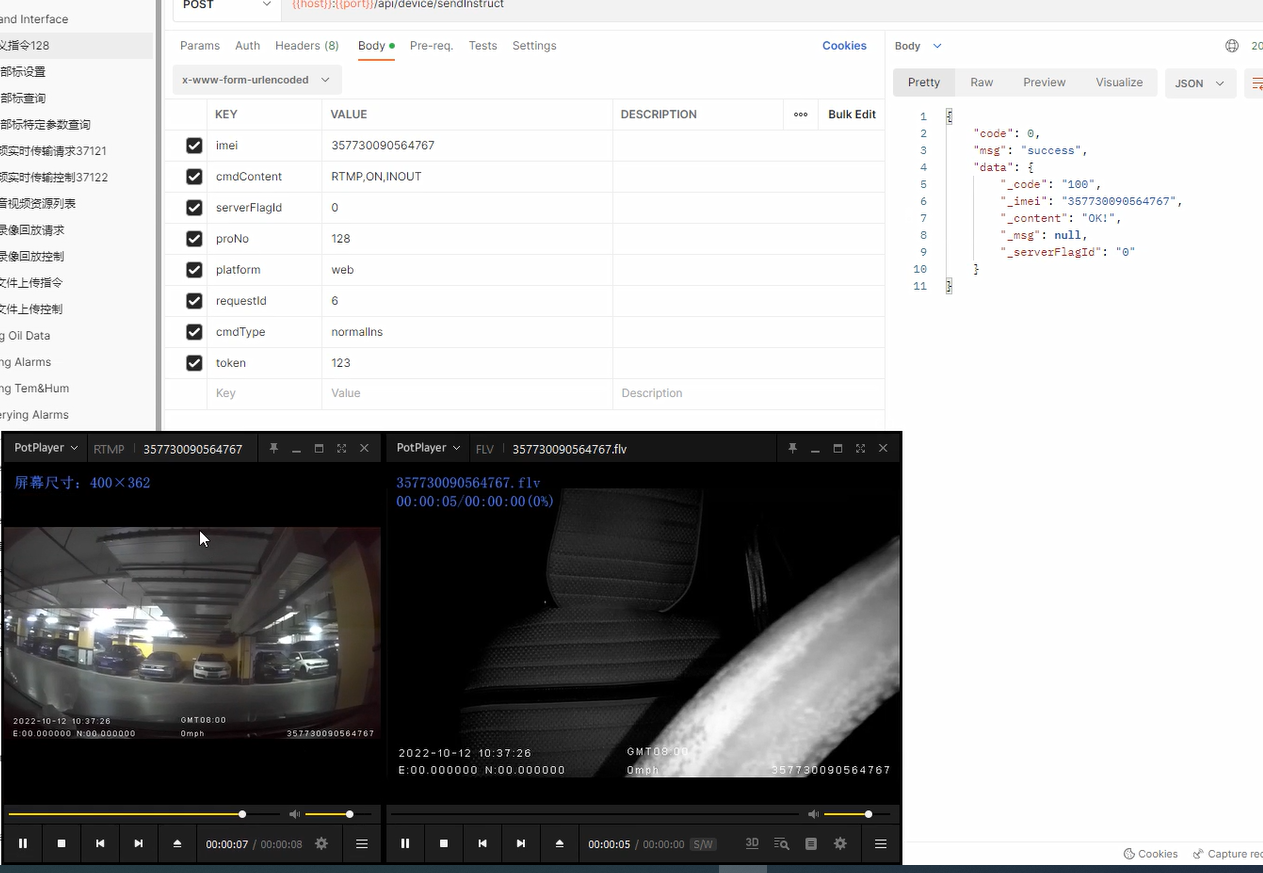
Pull the stream and check the result
If the data pull is successful, the streaming video will appear on the media player
1.3.4 Turn-off real time video
Send command RTMP,OFF,<B>,<C>(please check device command list for details) or turn off media player for 20 seconds
Note: The service will automatically disconnect the stream link and stop pushing stream when there's no pulling stream action.
1.3.5 Pull History Stream

1.3.5.1 Pull History Stream Steps
bash
# 1. Set an address to receive the file list
FILELIST,A
A=URL to receive history video list, which should be an HTTP service that can parse JSON data list

# 2. Request to upload the video list (Command delivered over TCP)
FILELIST
The history video name request by FILELIST will be upload to address A

# 3. Request the video name of the historical video, and then send it
REPLAYLIST,A
A is the whole playback video name (support video name list, separate with ',', Maximum video number is 8)

# 4. Check the video by pulling the stream
`rtmp://{server IP}:1936/live/{Device IMEI}`
`http://{server IP}:8881/live/{Device IMEI}.flv`
`http://{server IP}:8881/live/{Device IMEI}/hls.m3u8`(HLS)
1.3.5.2 FILELIST Request & Response
For the historical videos of this device model, you need to get the video name list first. To receive video list file for playback, you need to implement an HTTP service that can parse JSON data list. In your HTTP service, you must have a response in the format {"code":0,"ok":true}, otherwise, you will get a fail response after sending command FILELIST.
After configuring the HTTP service address to command FILELIST,<A> and sending the command FILELIST, the device will upload the video list file to your specified HTTP address.
Please refer to the following request and response definition.
Request
| HTTP Method | POST |
|---|---|
| Data | Body/raw/JSON |
| Parameter | Types | Required | Description |
|---|---|---|---|
| imei | String | Y | |
| fileNameList | String | Y | Video name list |
E.g. {"imei":"357730090564767","fileNameList":"20216_10_18_50_17_01.mp4,2021_06_10_18_51_20_01.mp4,2021_06_10_18_52_20_01.mp4"}
Response
| Content-Type | Application/json;charset=UTF-8 |
|---|
The data receiving service needs to respond correctly in JSON format, otherwise there would be an error response.
| Parameter | Types | Required | Description |
|---|---|---|---|
| code | boolean | Y | Resonse result code, success=0 |
| msg | boolean | N | Result code description |
| ok | boolean | Y | true |
{"code":0,"ok":true}
1.3.6 Turn off History Stream
Issue command REPLAYLIST,OFF or turn off the media player for 20 seconds.
Note: IoThub Media service will automatically disconnect the steam link and stop pushing stream when it detects that there is no pulling stream action.
1.3.7 Upload/Download History Video
Send the command HVIDEO/EVIDEO (please check device command list for details). After uploading the file completely, the SaaS platform will receive an alarm with alertType 105 (0x69) via pushalarm API.

1.3.8 Download Event Video
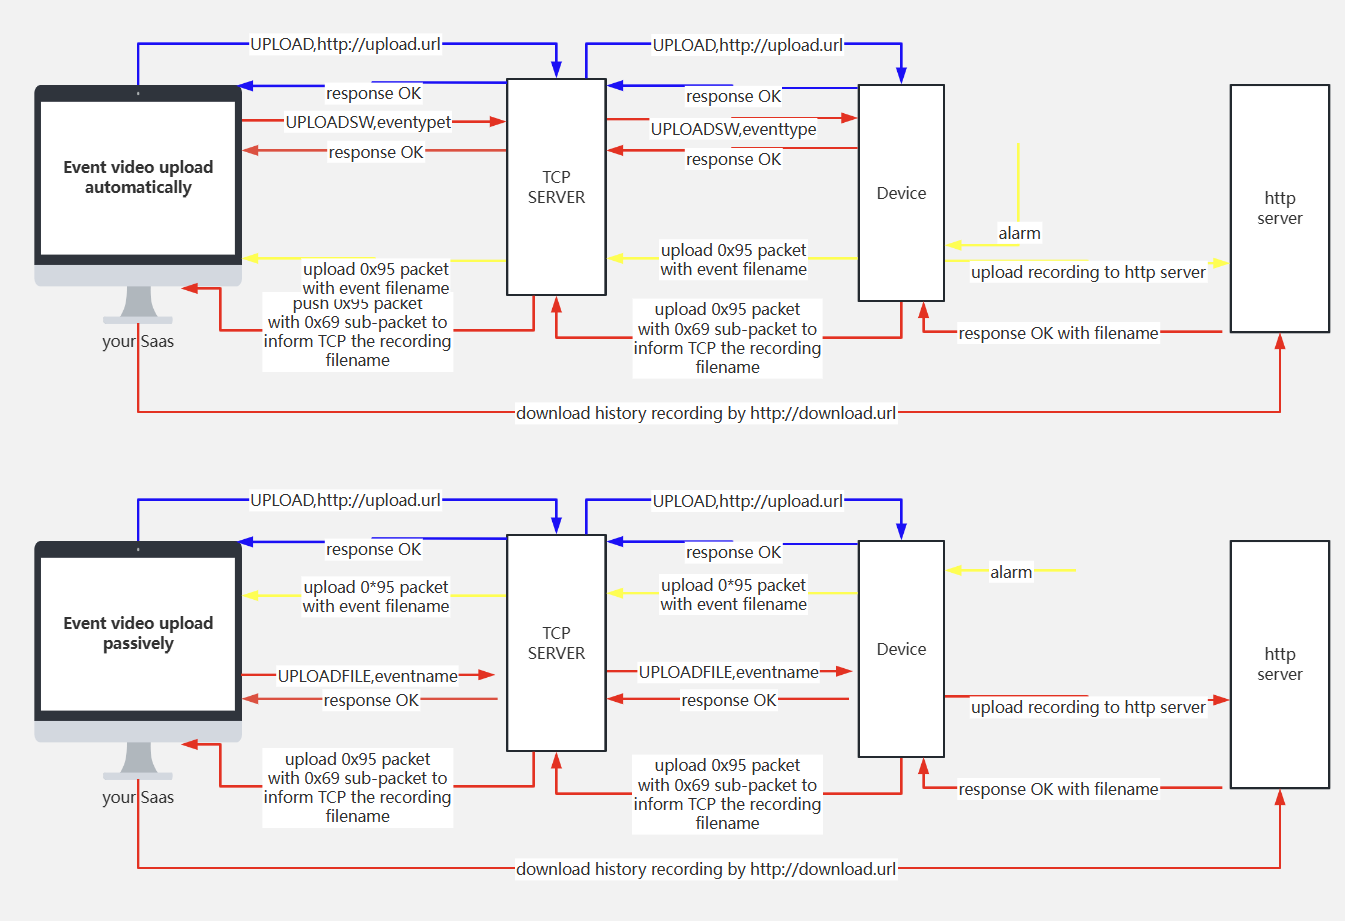
Customers can download event videos either in automatic way or passive way. For details, please refer to this online toplogy.
1.4 Image/Video Name
Image/Video File Name of CONCOX device
The format of the event video file name is: EVENT + device IMEI + serverFlag (00000000 by default) + time + F/I + SerialNumber, F:front camera, I: internal camera. such as EVENT_353376110007413_00000000_2020_06_13_16_37_42_23_F_55.mp4.
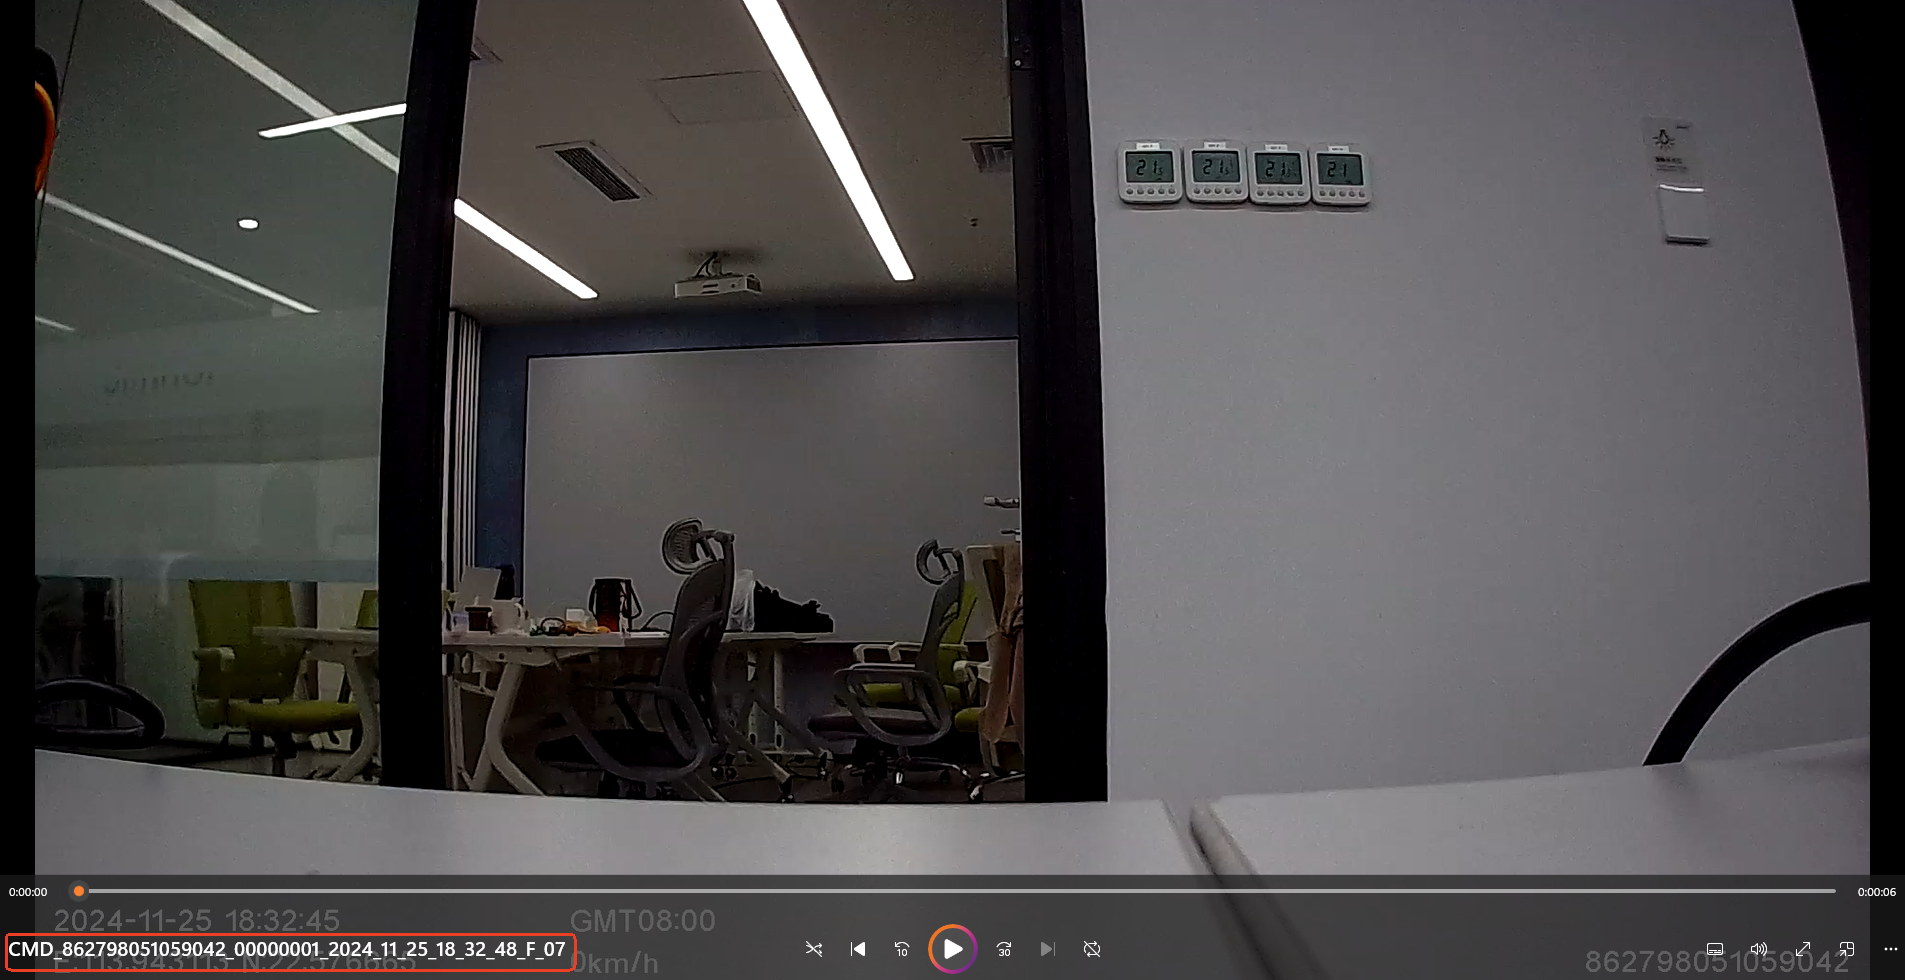
The format of the remote video file name is: CMD + device IMEI + serverFlag (00000000 by default) + time + F/I + SerialNumber, such as CMD_353376110007413_00000001_2020_06_13_16_23_09_08_F_07.ts.
2 JT/T Protocol Device
2.1 Device Connection
Note:
- Ensure that the SIM card and TF card are attached to the device
- Ensure that the device is powered on and networked
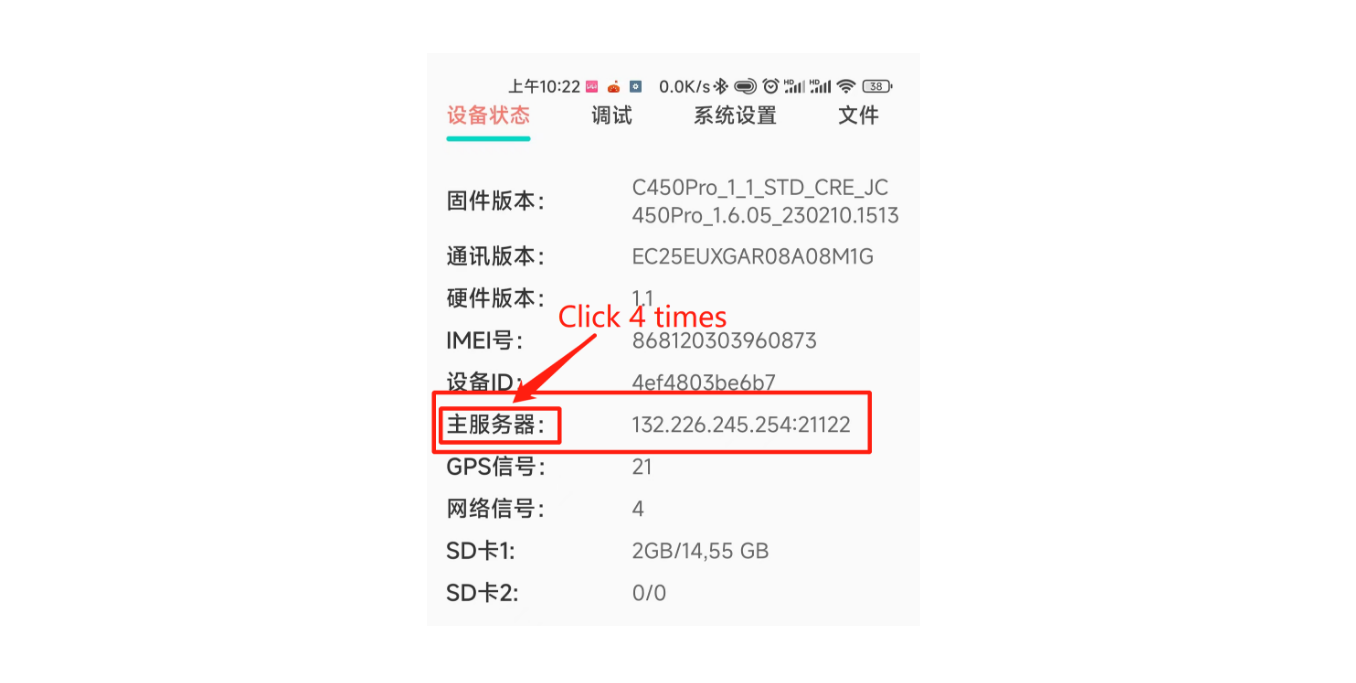
2.1.1 Command Delivery
Command delivered by the SMS, gateway port
21122bash# Configure the gateway server(JC450) - SERVER,{User Server IP},{Gateway PORT},NA,NA,NA,NA e.g. SERVER,120.78.224.93,21122,NA,NA,NA,NAbash# Configure the gateway server(JC181) - SERVER,0,{User Server IP},{Gateway PORT},0# e.g. SERVER,0,120.78.224.93,21122,0# - URLTYPE,2Command delivered by the Wifikit, gateway port
21122
- 1. Connect phone to device mobile data
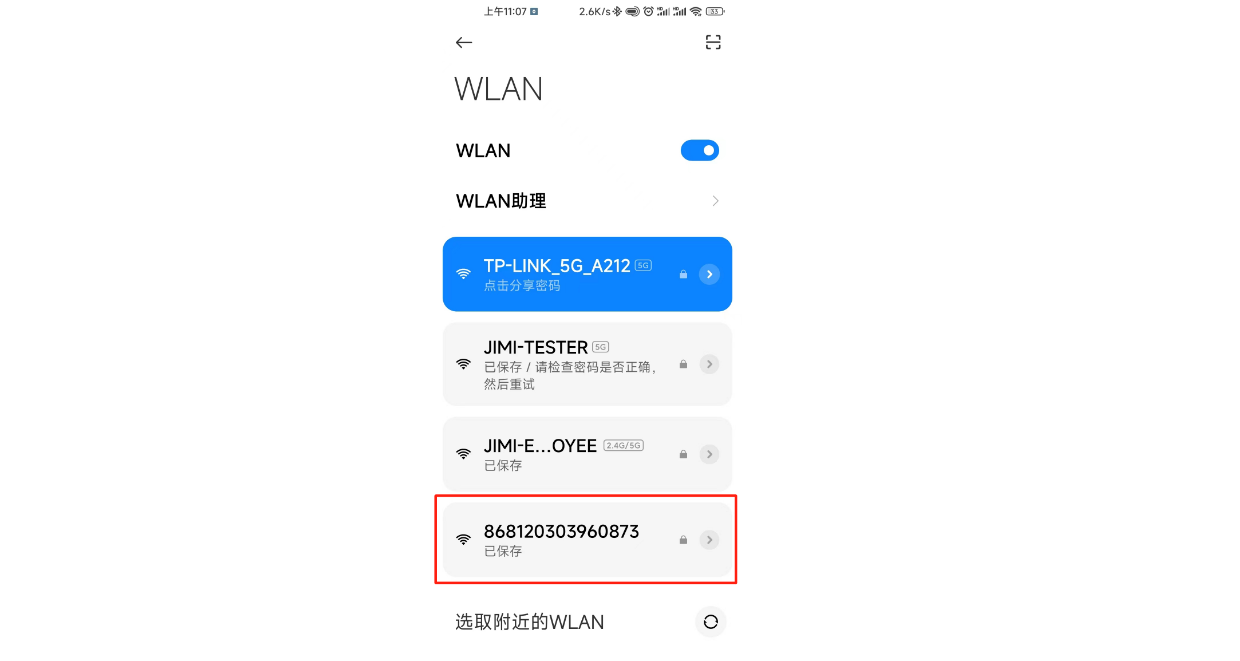
- 2. Open the wifikit, config server IP & Port

For the Wifikit.apk, user manual and command list of JC450 series, please contact our customer service
Note:
Reboot the device after the configuration. Once reboot done, you can start testing with IoTHub.
2.2 Basic Test
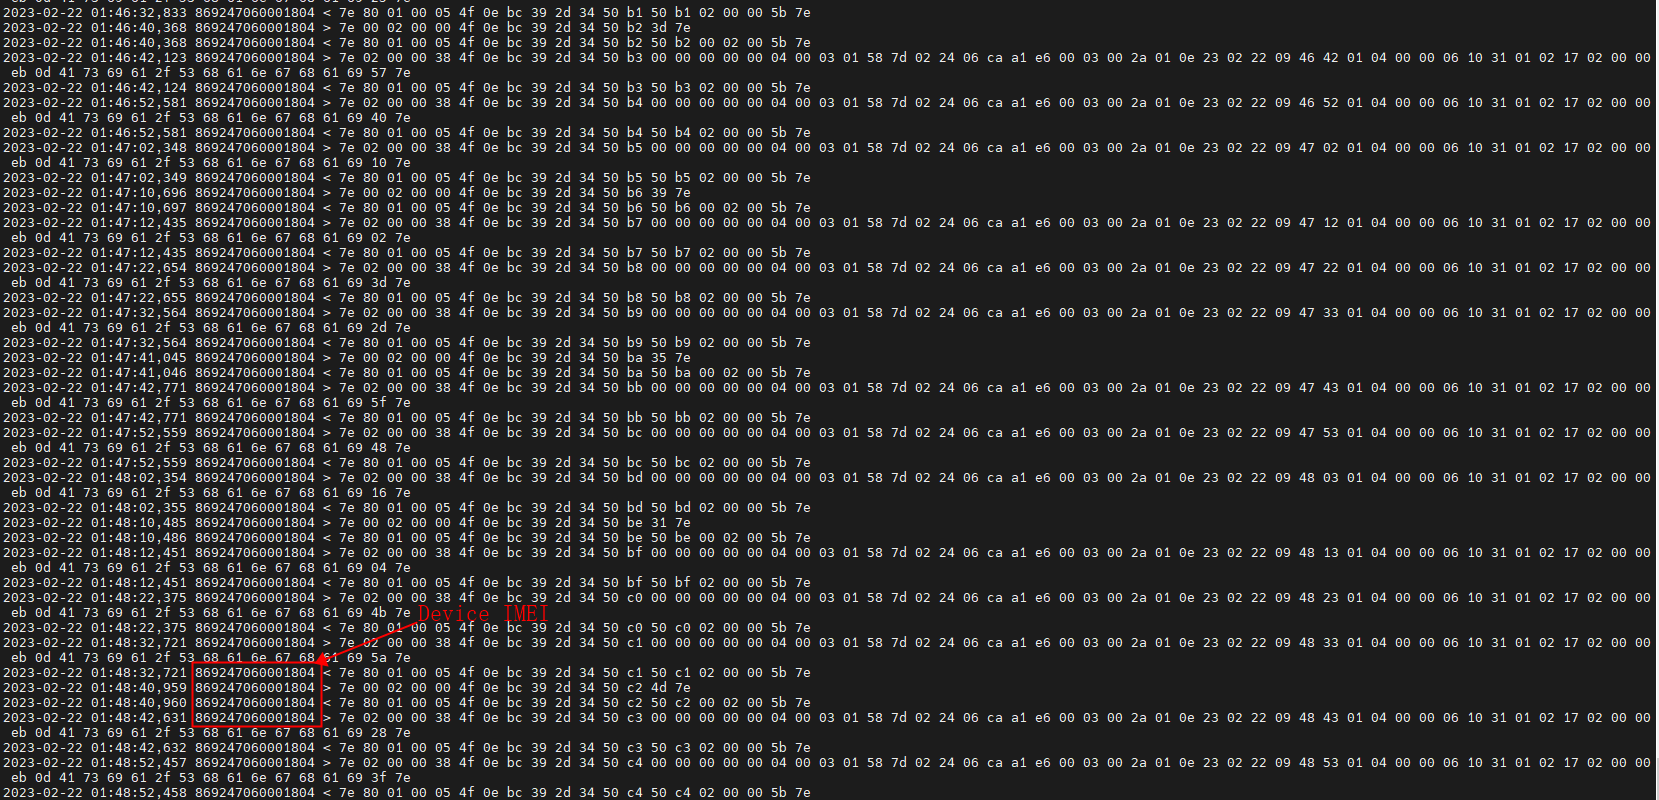
2.2.1 Check Device and IoTHub Connection
Check dump.log in folder /iothub/gate-iothub-c450/logs/dump/ to see if the device has logged into the IoTHub gateway. The log looks similar to the following figure.
2.2.2 Use API(Pro. 128) to issue command
E.g.
bash
curl --location 'http://113.108.62.202:10088/api/device/sendInstruct' \
--header 'Content-Type: application/x-www-form-urlencoded' \
--data-urlencode 'imei=862798050240873' \
--data-urlencode 'cmdContent=SERVER' \
--data-urlencode 'serverFlagId=1' \
--data-urlencode 'proNo=128' \
--data-urlencode 'platform=web' \
--data-urlencode 'requestId=6' \
--data-urlencode 'cmdType=normallns' \
--data-urlencode 'token=123'
2.2.3 Check Heartbeat/GPS/Alarm push data
Check heartbeat push data
Please check heartbeat data in all.log(default path: /iothub/msg-dispatch-iothub/) with command: tail -f all.log
Check GPS push data
Please check GPS data in all.log(default path: /iothub/msg-dispatch-iothub/) with command: tail -f all.log
Check alert push data
Please check alert data in all.log(default path: /iothub/msg-dispatch-iothub/) with command: tail -f all.log
2.3 Advanced Test
2.3.1 Stream Push/Pull Preparation
Ensure that the Media service is enabled and the external network can access its port
Ensure that the device is correctly configured with commands
Install VLC or other media players to test real-time video and check whether the device can work properly on IoTHub. See the subsequent chapters for stream pull configuration.
2.3.2 Pull Live Stream Test
Request Live Stream API(37121)
 bash
bashimei:868120303960873 cmdContent:{"dataType":0 , "codeStreamType":0, "channel":"3", "videoIP":"120.78.224.93", "videoTCPPort":"10002","videoUDPPort":0} serverFlagId:0 proNo:37121 platform:web requestId:6 cmdType:normallns token:123Pull Live Stream URL
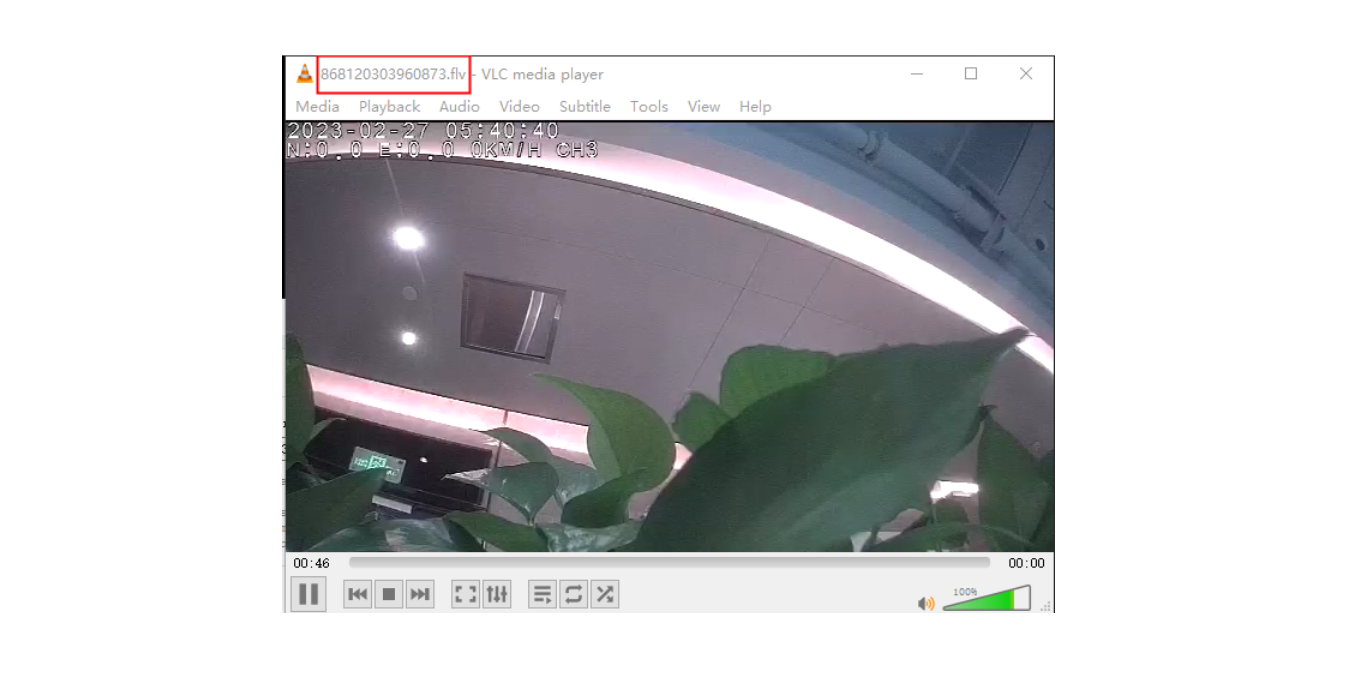
rtmp://{your IoTHub server IP}:1936/{Channel ID}/{Device IMEI}http://{your IoTHub server IP}:8881/{Channel ID}/{Device IMEI}.flvhttp://{your IoTHub server IP}:8881/{Channel ID}/{Device IMEI}/hls.m3u8(HLS)e.g.:
rtmp://120.78.224.93:1936/3/868120303960873
http://120.78.224.93:8881/3/868120303960873.flv
http://120.78.224.93:8881/3/868120303960873/hls.m3u8
2.3.3 Pull History Stream Test
Request API(proNo: 37381) to obtain a list of historical video list, which will be pushed to the API /pushresourcelist.
Request history Stream API(37377)
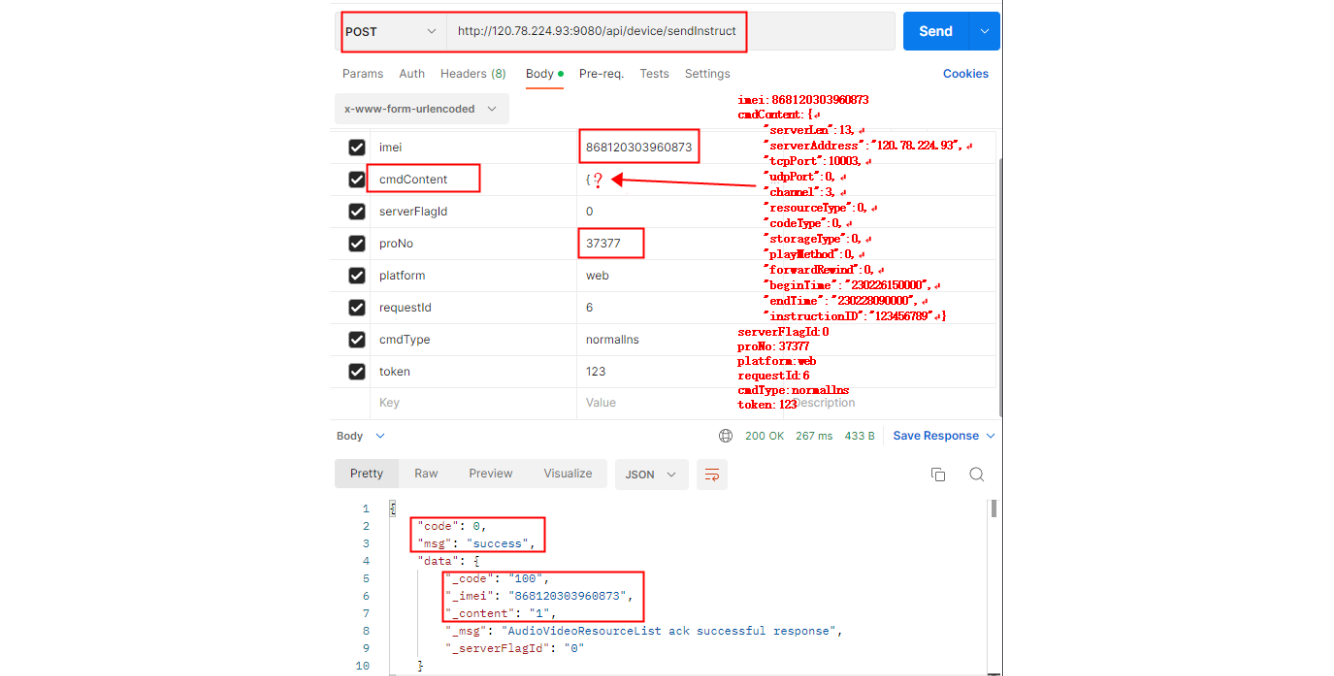 bash
bashimei:868120303960873 cmdContent:{↵ "serverLen":13,↵ "serverAddress":"120.78.224.93",↵ "tcpPort":10003,↵ "udpPort":0,↵ "channel":3,↵ "resourceType":0,↵ "codeType":0,↵ "storageType":0,↵ "playMethod":0,↵ "forwardRewind":0,↵ "beginTime":"230226150000",↵ "endTime":"230228090000",↵ "instructionID":"123456789"↵} serverFlagId:0 proNo:37377 platform:web requestId:6 cmdType:normallns token:123Pull History Stream URL
rtmp://{your IoTHub server IP}:1936/{Channel ID}/{Device IMEI}.historyhttp://{your IoTHub server IP}:8881/{Channel ID}/{Device IMEI}.history.flvhttp://{your IoTHub server IP}:8881/{Channel ID}/{Device IMEI}.history/hls.m3u8(HLS)E.g.:
rtmp://172.26.10.126:1936/3/868120303960873.history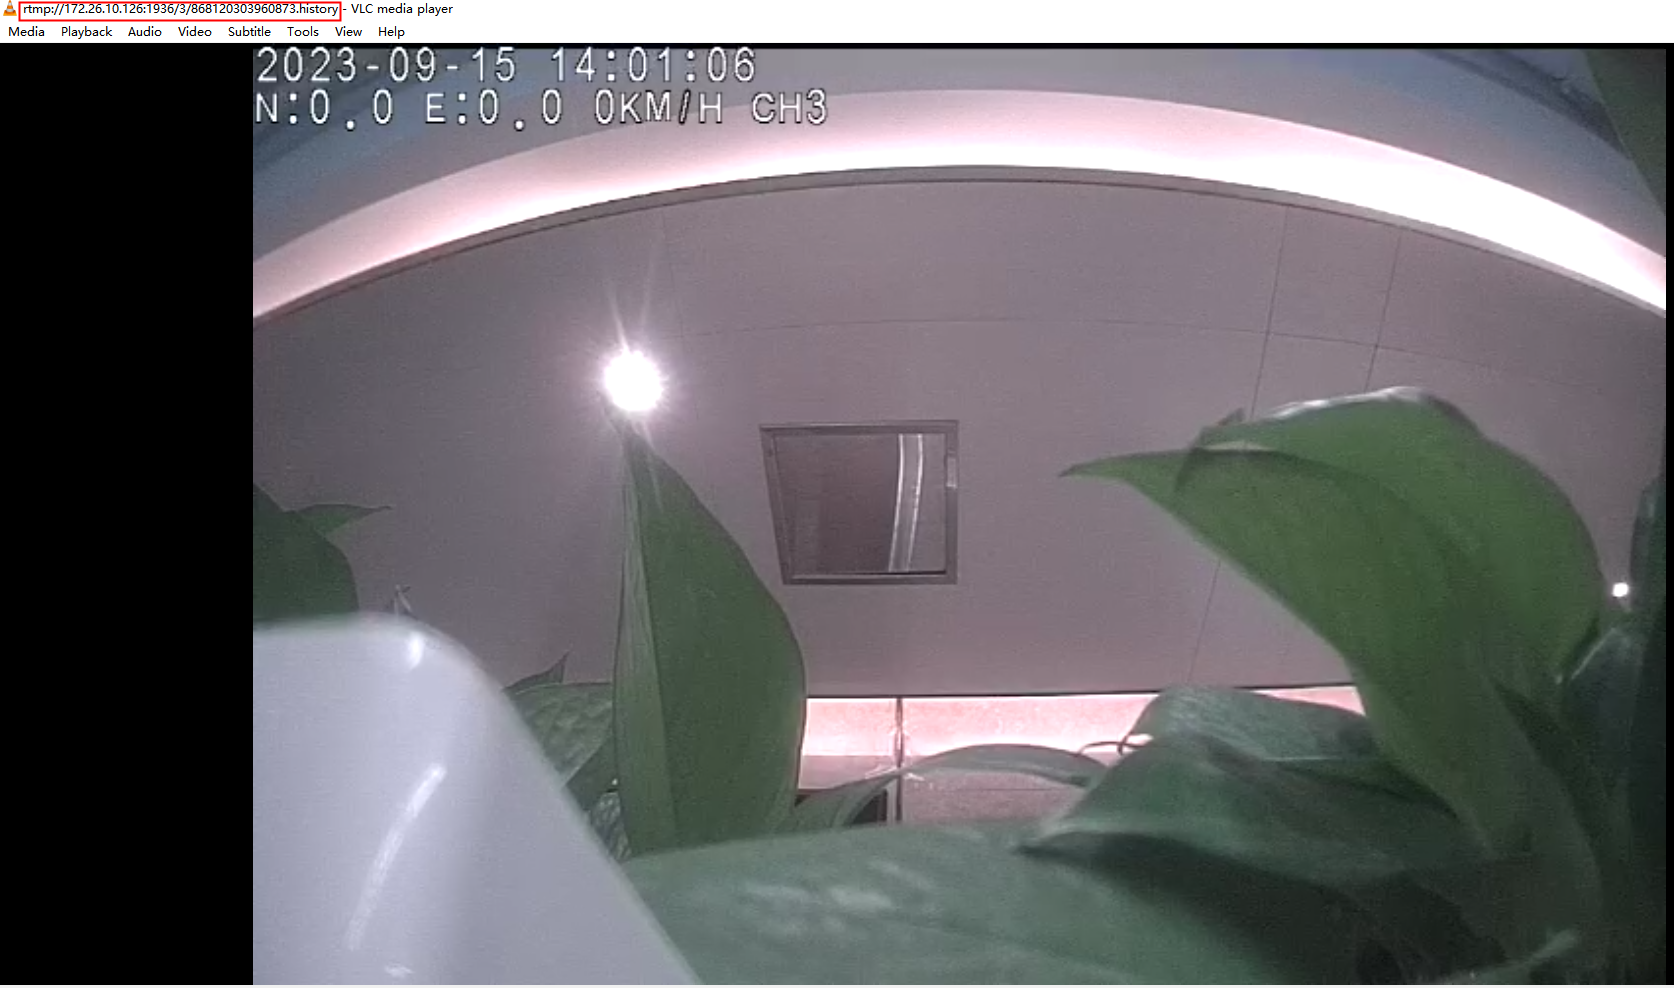
http://120.78.224.93:8881/1/868120303960873.history.flv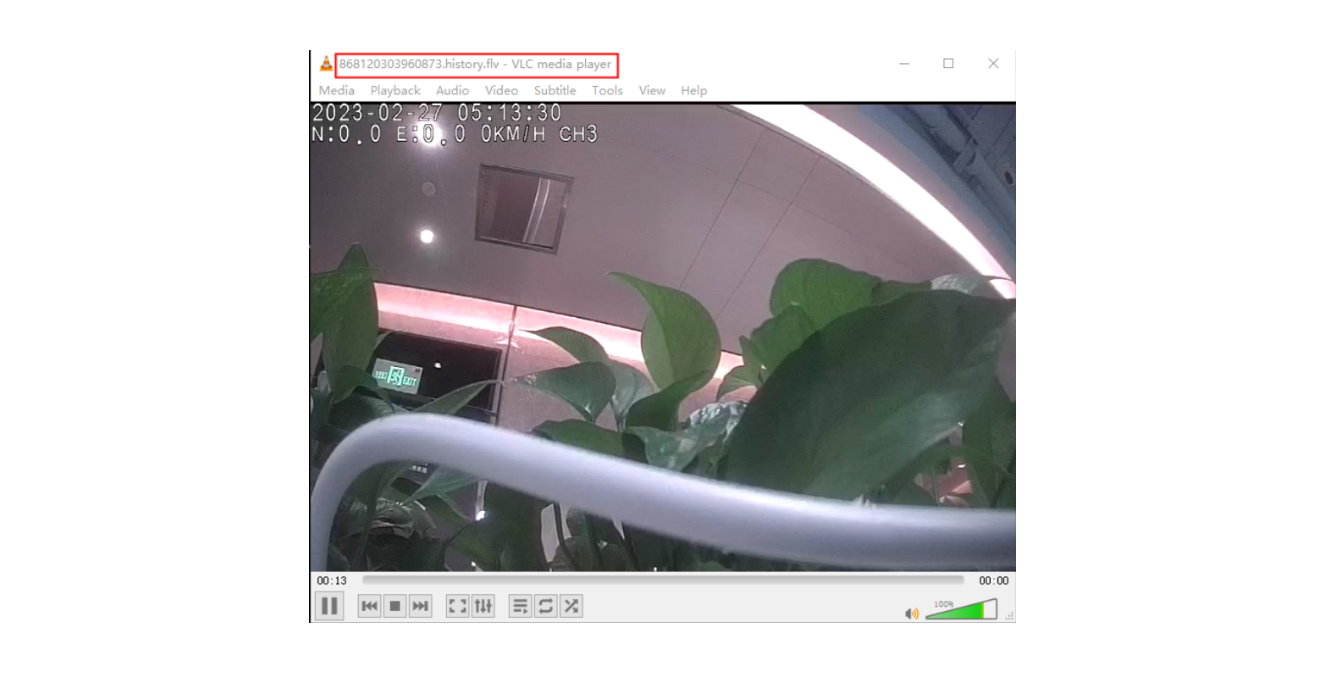
http://120.78.224.93:8881/1/868120303960873.history/hls.m3u8
2.3.4 Turn off Video Playback
- Request API(proNo: 37382) to push the stream to IoTHub Media server.
OR
- Turn off the player for 20 seconds. IoThub Media service will automatically disconnect the link and stop pushing stream when it detects that there is no one pulling the stream.
2.3.5 Upload History Video
Build your own FTP server.
Request API (proNo: 37381) to obtain a list of historical videos, which will be pushed to the push API /pushresourcelist.
Request API (proNo: 37382) to upload the video to the FTP server at the start and end time interval. The upload result notification will be pushed via API /pushftpfileupload.
2.3.6 Upload/Download Event Video
- Prerequisite: URLTYPE,2
- Trigger any event, the device will report an alarm, the alarm contains alarmlabel
- The platform can provide front-end configuration page for users to choose, the background to automatically send the corresponding alarm VIDEOUPLOAD request
- Upon receipt of the request, the device will retrieve the image/video file associated with the alarmlabel from the database and upload it to the domain/IP and port in the request.
- If it exists, will respond ‘start upload task’;
- If it does not exist, will respond ‘Video not exist’!
- If the file upload is successful, the device will report UPLOADFILECOMPLETE: ‘filename’ at 0x0900.
- If the file upload fails, the device will report UPLOADFILEFAIL: ‘file name’ via 0x0900.
- If the uploaded file does not exist, the device will report UPLOADFILEFAIL: no image or no video at 0x0900.
Note: Fixed path is /upload, such as, IP 183.238.245.122, port 1115, the device upload address is http://183.238.245.122:1115/upload (protocol integration please contact JIMI for protocol documentation).
2.3.7 Manual Acknowledge Alarms/Stop Reporting Alarms
- Some JT/T808 device alarms require manual acknowledgment to stop reporting alarms, such as SOS alarms, you can request API(proNo: 33283) to stop them.
2.3.8 Text to Speech
- Request API(proNo: 33536) can convert text to voice and send to devices, but only supports Chinese and English.
2.4 Device Sleep, Work, Wakeup
2.4.1 Meaning of device sleep, work, wakeup and their applications
Hibernation: Before the device goes into sleep, it will report 0x0410 alarm to notify the platform.
Work: When the device wakes up, it will report 0x0411 alarm to notify the platform.
Wake up: Continuously vibrate the device, or the platform sends WAKEUP_QUERY command (this command will not be replied), about 30 seconds, the device will connect to the server.
Application:
- The platform should record the last equipment status report
- After the wake-up operation, before receiving the 0x0411 alarm, the platform web page can display WAKING UP for the user to wait.
- After receiving the 0x0411 alarm, the platform then sends the actual request from the user and exits the WAKING UP pop-up window.
2.4.2 Sleep and Wake Up of JC450/JC181
JC450: The main chip is not working during the whole sleep period. If you need to query the configuration, view the real-time video or other operations, you can wake up by vibration/SOS button/platform, and then perform the actual operation after the device wakes up.
JC181: During sleep, the device is controlled by the communication module, which only supports part of the ordinary command interaction, and cannot perform video operation and configuration.
2.5 Image/Video name
- Image/Video File Name of JC450
DEVICE IMEI_ALARM LABEL_CHANNEL_SN.jpg, SN:serial number of pictures or videos
E.g. :
868120303960873_33393630383733240821162501000500_1_00.jpg 868120303960873_33393630383733240821162501000500_1_01.jpg 868120303960873_33393630383733240821162501000500_1_02.jpg
DEVICE IMEI_ALARM LABEL_CHANNEL_SN.mp4
E.g.:
868120303960873_33393630383733240821162501000500_1_00.mp4
